tl;dr If you just came to download the bootable USB stick filesystem to boot your tablet, click here.
You will need to format a USB key (minimum 1GB) with a VFAT/FAT32 filesystem with the label ARCH_201512, unzip the contents of the file to the USB key, and read the section marked Grub near the bottom of this post to boot! It shouldn’t require Linux to set up the USB key.
I highly recommend you make a backup of the tablet before you proceed to install Linux. The easiest/fastest/laziest way I have found is to use dd and pigz to make a block for block backup of the internal EMMC onto an ext4 formatted microSD card (as the archive will exceed the 4GB limit of VFAT).
So, you have a Bay Trail based tablet, in my case a Dell Venue 8 Pro (model 3845), and you want to install Linux on it. Chances are pretty good that your tablet will use SDIO for WiFi, and this means that you will start the installer and quickly realize you have no WiFi. Bummer. Hope you’ve got a USB to Ethernet adapter with you, and a USB OTG hub with 3 ports.
Or, you could compile a custom kernel with patches for the SDIO WiFi chipset, put it into the Arch Linux installer, and then have glorious WiFi for your installation.
I chose the second option, because USB ethernet adapters are slow. And now I will tell you how I did it, so you too can do it too.
First: you need to have a computer which can build a normal Linux kernel. I run Arch Linux also on my laptop, so just install the development tools and you can start:
$ sudo pacman -S base-devel arch-install-scripts squashfs-tools
Go download the latest stable Linux kernel from kernel.org, I used the following: https://cdn.kernel.org/pub/linux/kernel/v4.x/linux-4.3.2.tar.xz
Then you need to download the source code for the rtl8723bs WiFi chipset module (it is not in mainline yet):
https://github.com/hadess/rtl8723bs
Decompress the Linux source you downloaded earlier:
$ tar -xf linux-4.3.2.tar.xz
And decompress the rtl8723bs driver you downloaded earlier:
$ unzip rtl8723bs-master.zip
Don’t forget to apply the patches from the rtl8723bs driver:
$ cd linux-4.3.2
linux-4.3.2 ~$ patch -p1 < ../rtl8723bs-master/patches/0001-PM-QoS-Add-pm_qos_cancel_request_lazy-that-doesn-t-s.patch
patching file include/linux/pm_qos.h
patching file kernel/power/qos.c
linux-4.3.2 ~$ patch -p1 < ../rtl8723bs-master/patches/0001-mmc-sdhci-get-runtime-pm-when-sdio-irq-is-enabled.patch
patching file drivers/mmc/host/sdhci.c
Hunk #1 succeeded at 1731 (offset -13 lines).
Hunk #2 succeeded at 1743 (offset -13 lines).
linux-4.3.2 ~$ patch -p1 < ../rtl8723bs-master/patches/0002-mmc-sdhci-Support-maximum-DMA-latency-request-via-PM.patch
patching file drivers/mmc/host/sdhci.c
Hunk #2 succeeded at 1402 (offset 2 lines).
Hunk #3 succeeded at 1427 (offset 2 lines).
Hunk #4 succeeded at 2206 (offset 2 lines).
Hunk #5 succeeded at 2279 (offset 2 lines).
Hunk #6 succeeded at 2911 (offset 2 lines).
Hunk #7 succeeded at 3407 (offset 2 lines).
Hunk #8 succeeded at 3472 (offset 2 lines).
Hunk #9 succeeded at 3529 (offset 2 lines).
patching file drivers/mmc/host/sdhci.h
Hunk #2 succeeded at 428 (offset 5 lines).
linux-4.3.2 ~$ patch -p1 < ../rtl8723bs-master/patches/0003-mmc-sdhci-acpi-Fix-device-hang-on-Intel-BayTrail.patch
patching file drivers/mmc/host/sdhci-acpi.c
linux-4.3.2 ~$ patch -p1 < ../rtl8723bs-master/patches/0004-mmc-sdhci-pci-Fix-device-hang-on-Intel-BayTrail.patch
patching file drivers/mmc/host/sdhci-pci.c
If any of the patches fail to apply, do not proceed with building the kernel, you will not build a working kernel with SDIO WiFi support.
Moving right along, I stole the stock Arch Linux configuration from the 2015.12 installer ISO and ran make oldconfig to bring it up to date on Linux 4.3.2.
Here is a copy of the .config which you will want to use. The .config is inside the zip file, just move the zip file to the linux-4.3.2 directory and unzip.
Verify that everything is cool with the .config file you decompressed (if you use a newer kernel this will prompt you to answer questions about new features supported which are not in the config file):
linux-4.3.2 ~$ make oldconfig
scripts/kconfig/conf  --oldconfig Kconfig
#
# configuration written to .config
#
linux-4.3.2 ~$ make -j 9
Now wait a really long time. I will never understand why Arch Linux includes kernel modules for USB webcams in their text-only installer media…
Now, while this is happening, download the latest Arch Linux live installation media, because we’re going to open it up and replace the kernel and squashfs:
https://www.archlinux.org/download/
I followed the excellent Arch Wiki instructions to remaster the install ISO:
https://wiki.archlinux.org/index.php/Remastering_the_Install_ISO
Mount the ISO somewhere:
$ mkdir /tmp/archlinux-iso
$ sudo mount -o loop archlinux-2015.12.01-dual.iso /tmp/archlinux-iso
Since I have 16GB of RAM, I just do everything in /tmp because it’s a ramdisk and faster than an SSD:
$ cp /tmp/archlinux-iso/arch/x86_64/airootfs.sfs /tmp/
$ cd /tmp/
$ unsquashfs airootfs.sfs
Now, hopefully by now your kernel has finished building and we can install it to the recently unsquashed install ISO:
linux-4.3.2 ~$ sudo make INSTALL_MOD_PATH=/tmp/squashfs-root modules_install
linux-4.3.2 ~$ sudo cp arch/x86/boot/bzImage /tmp/squashfs-root/boot/vmlinuz
This will install our kernel modules to the squashfs-root folder. Feel free to delete the modules from the previous kernel version if you want to save space (for me this was 4.2.5-1-ARCH):
$ sudo rm -rf /tmp/squashfs-root/lib/modules/4.2.5-1-ARCH/
Now, we need to build the rtl8723bs module:
$ cd rtl8723bs-master
rtl8723bs-master ~$ make KSRC=~/linux-4.3.2 KVER=4.3.2-ARCH
  (output omitted for brevity)
  Building modules, stage 2.
  MODPOST 1 modules
  CC      /home/hmartin/rtl8723bs-master/r8723bs.mod.o
  LD [M]  /home/hmartin/rtl8723bs-master/r8723bs.ko
make[1]: Leaving directory '/home/hmartin/linux-4.3.2'
rtl8723bs-master ~$ sudo cp r8723bs.ko /tmp/squashfs-root/lib/modules/4.3.2-ARCH/kernel/drivers/net/wireless/
rtl8723bs-master ~$ sudo chmod 0644 /tmp/squashfs-root/lib/modules/4.3.2-ARCH/kernel/drivers/net/wireless/r8723bs.ko
rtl8723bs-master ~$ sudo cp -n rtl8723bs_nic.bin /tmp/squashfs-root/lib/firmware/rtlwifi/rtl8723bs_nic.bin
rtl8723bs-master ~$ sudo cp -n rtl8723bs_wowlan.bin /tmp/squashfs-root/lib/firmware/rtlwifi/rtl8723bs_wowlan.bin
Okay, now we need to chroot into the decompressed squashfs filesystem to create an initrd. We need to modify /etc/mkinitcpio.conf in the squashfs root so we can generate an initrd with the correct modules and options, otherwise your tablet won’t boot with the new kernel:
$ sudo arch-chroot /tmp/squashfs-root
(chroot) $ depmod -a 4.3.2-ARCH
(chroot) $ vi /etc/mkinitcpio.conf
- MODULES=""
+ MODULES="r8723bs"
- HOOKS="base udev autodetect modconf block filesystems keyboard fsck"
+ HOOKS="base udev memdisk archiso_shutdown archiso archiso_loop_mnt archiso_pxe_common archiso_pxe_nbd archiso_pxe_http archiso_pxe_nfs archiso_k
ms block pcmcia filesystems keyboard"
- #COMPRESSION="xz"
+ COMPRESSION="xz"
Earlier we installed the 4.3.2-ARCH kernel modules, and also copied the kernel to /boot/ within the decompressed squashfs filesystem. Now we are going to use the modules, the vmlinuz kernel in /tmp/squashfs-root/boot/, and the above modifications to the /etc/mkinitcpio.conf file to generate a new initrd which we will call archiso.img:
(chroot) $ mkinitcpio -k /boot/vmlinuz -c /etc/mkinitcpio.conf -g /boot/archiso.img -k 4.3.2-ARCH
==> Starting build: 4.3.2-ARCH
  -> Running build hook: [base]
  -> Running build hook: [udev]
  -> Running build hook: [memdisk]
  -> Running build hook: [archiso_shutdown]
  -> Running build hook: [archiso]
  -> Running build hook: [archiso_loop_mnt]
  -> Running build hook: [archiso_pxe_common]
==> WARNING: Possibly missing firmware for module: liquidio
  -> Running build hook: [archiso_pxe_nbd]
  -> Running build hook: [archiso_pxe_http]
  -> Running build hook: [archiso_pxe_nfs]
  -> Running build hook: [archiso_kms]
  -> Running build hook: [block]
==> WARNING: Possibly missing firmware for module: wd719x
==> WARNING: Possibly missing firmware for module: aic94xx
  -> Running build hook: [pcmcia]
  -> Running build hook: [filesystems]
  -> Running build hook: [keyboard]
==> Generating module dependencies
==> Creating xz-compressed initcpio image: /boot/archiso.img
==> Image generation successful
Pack the contents of squashfs-root back into a squashfs image:
/tmp ~$ mksquashfs squashfs-root airootfs.sfs
Okay, now it’s time to create the USB boot media. You will need at least a 1GB USB key for this, and you will lose all the data current on the USB key.
If your stick was previously formatted with a FAT32 partition, skip this step:
$ sudo fdisk /dev/sdX

Welcome to fdisk (util-linux 2.27.1).
Changes will remain in memory only, until you decide to write them.
Be careful before using the write command.

Device does not contain a recognized partition table.
Created a new DOS disklabel with disk identifier 0xfa02f14c.

Command (m for help): o
Created a new DOS disklabel with disk identifier 0xf1b89f31.

Command (m for help): n
Partition type
   p   primary (0 primary, 0 extended, 4 free)
   e   extended (container for logical partitions)
Select (default p): p
Partition number (1-4, default 1): 1
First sector (2048-2097151, default 2048):
Last sector, +sectors or +size{K,M,G,T,P} (2048-2097151, default 2097151):

Created a new partition 1 of type 'Linux' and of size 1023 MiB.

Command (m for help): t
Selected partition 1
Partition type (type L to list all types): c
Changed type of partition 'Linux' to 'W95 FAT32 (LBA)'.

Command (m for help): w
The partition table has been altered.
Calling ioctl() to re-read partition table.
Now format and mount the USB key, this will erase all data on the USB key:
$ sudo mkfs.vfat -n ARCH_201512 /dev/sdX1
$ mkdir /tmp/archlinux-usb
$ sudo mount /dev/sdX1 /tmp/archlinux-usb
Copy the contents of the Arch installation ISO you mounted earlier to the USB key:
$ sudo cp -R /tmp/archlinux-iso/* /tmp/archlinux-usb/
Now, we need to replace the kernel, initrd, and squashfs filesystem on the USB key with the ones we made:
$ sudo cp /tmp/squashfs-root/boot/vmlinuz /tmp/archlinux-usb/arch/boot/x86_64/vmlinuz
$ sudo cp /tmp/squashfs-root/boot/archiso.img /tmp/archlinux-usb/arch/boot/x86_64/archiso.img
$ sudo cp /tmp/airootfs.sfs /tmp/archlinux-usb/arch/x86_64/airootfs.sfs
$ cd /tmp
/tmp ~$ echo $(md5sum airootfs.sfs) | sudo tee /tmp/archlinux-usb/arch/x86_64/airootfs.md5
Feel free to delete the i686 squashfs, since we did not compile an i686 kernel:
$ sudo rm /tmp/archlinux-usb/arch/i686/airootfs.*
If you’re building the boot media yourself, you will also need to put bootia32.efi in /tmp/archlinux-usb/EFI/boot/bootia32.efi since Bay Trail tablets only have 32-bit UEFI (the CPU is 64-bit). Download bootia32.efi here.
In summary:
- We downloaded Linux kernel from kernel.org
- We downloaded the rtl8723bs driver from GitHub
- We applied the patches required for SDIO from rtl8723bs to the kernel source
- We compiled the kernel and modules using the default Arch Linux .config file
- We decompressed the squashfs filesystem present on the Arch Linux ISO
- We installed the kernel modules compiled earlier
- We compiled and installed the r8723bs kernel module in the decompressed squashfs filesystem
- We used
chrootto rundepmodand generate a new initrd usingmkinitcpioinside the decompressed squashfs filesystem - (optional) We deleted old kernel modules from the decompressed squashfs filesystem
- We recompressed the squashfs filesystem
- We formatted our USB installation media
- We copied the unmodified Arch Linux ISO contents to the USB installation media
- We replaced
vmlinuz, initrd (archiso.img). and the x86_64 compressed squashfs filesystem on the USB installation media - We installed
bootia32.efion the USB installation media
Grub
There is an issue with the install media which I haven’t bothered to diagnose. Grub will not display the normal boot menu, so you have to type in the commands manually. You need a keyboard anyway to configure WiFi and start SSH, so you might as well get one out now…
set root=hd0,msdos1
linux /arch/boot/x86_64/vmlinuz archisobasedir=arch archisolabel=ARCH_201512 nomodeset
initrd /arch/boot/x86_64/archiso.img
boot
Wireless
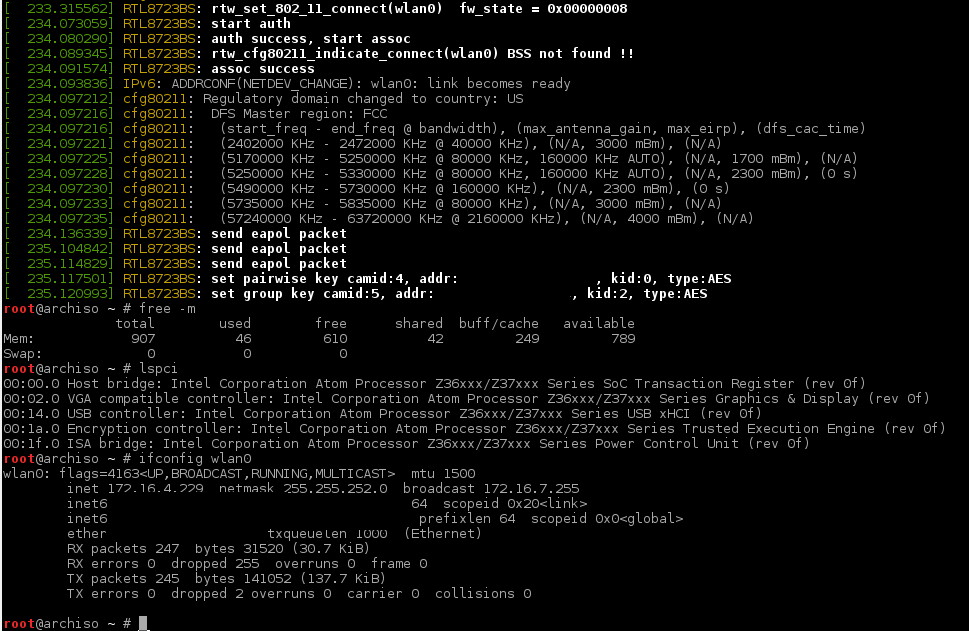
If all goes well, you will have a booted tablet with a wlan0 device. Follow the Arch instructions to configure wireless.
Or, create /etc/wpa_supplicant/MyNetwork.conf with your network details:
ctrl_interface=/var/run/wpa_supplicant
update_config=1
country=US

network={
  ssid="MyNetwork"
  psk="Staple Horse Battery XKCD"
}
Up the interface with wpa_supplicant:
$ wpa_supplicant -Dnl80211 -iwlan0 -c/etc/wpa_supplicant/MyNetwork.conf
If all goes well, wpa_supplicant will find and connect to your network, but you still won’t have an IP address, so switch to another TTY (e.g. ctrl+alt+F2) and run dhclient to get an IP address:
$ dhclient wlan0
Set a root password and start SSH:
$ passwd
$ systemctl start sshd
Find the IP address of your tablet:
$ ip addr
Now you should be able to SSH to your tablet from another computer, and complete the installation (I have censored my MAC addresses):
Notes: I haven’t actually installed Arch Linux on my Dell Venue 8 Pro (3845) yet. I need to use it over the holidays and want it to work. I will try to post a follow up in the next few months about my experience installing and using Arch Linux on it.
Also, I did this and wrote the post in one afternoon. Usually when I post something here, I work on it for several days and then sit on the draft in case there are any mistakes. However, since I am leaving for Christmas vacation shortly, I wanted to get this out quickly so people could read it over the holidays. There may be errors or omissions in the article which prevent it from working exactly as written. If I discover any errors, I will update the article to correct them.