Monthly Archives: January 2018

CompuLab fitlet2 review

Introduction
The CompuLab fitlet2 is a new model in their fitlet series. The new fitlet2 switches from AMD to Intel’s Apollo Lake SoCs. My unit has the Intel Atom x7-E3950.

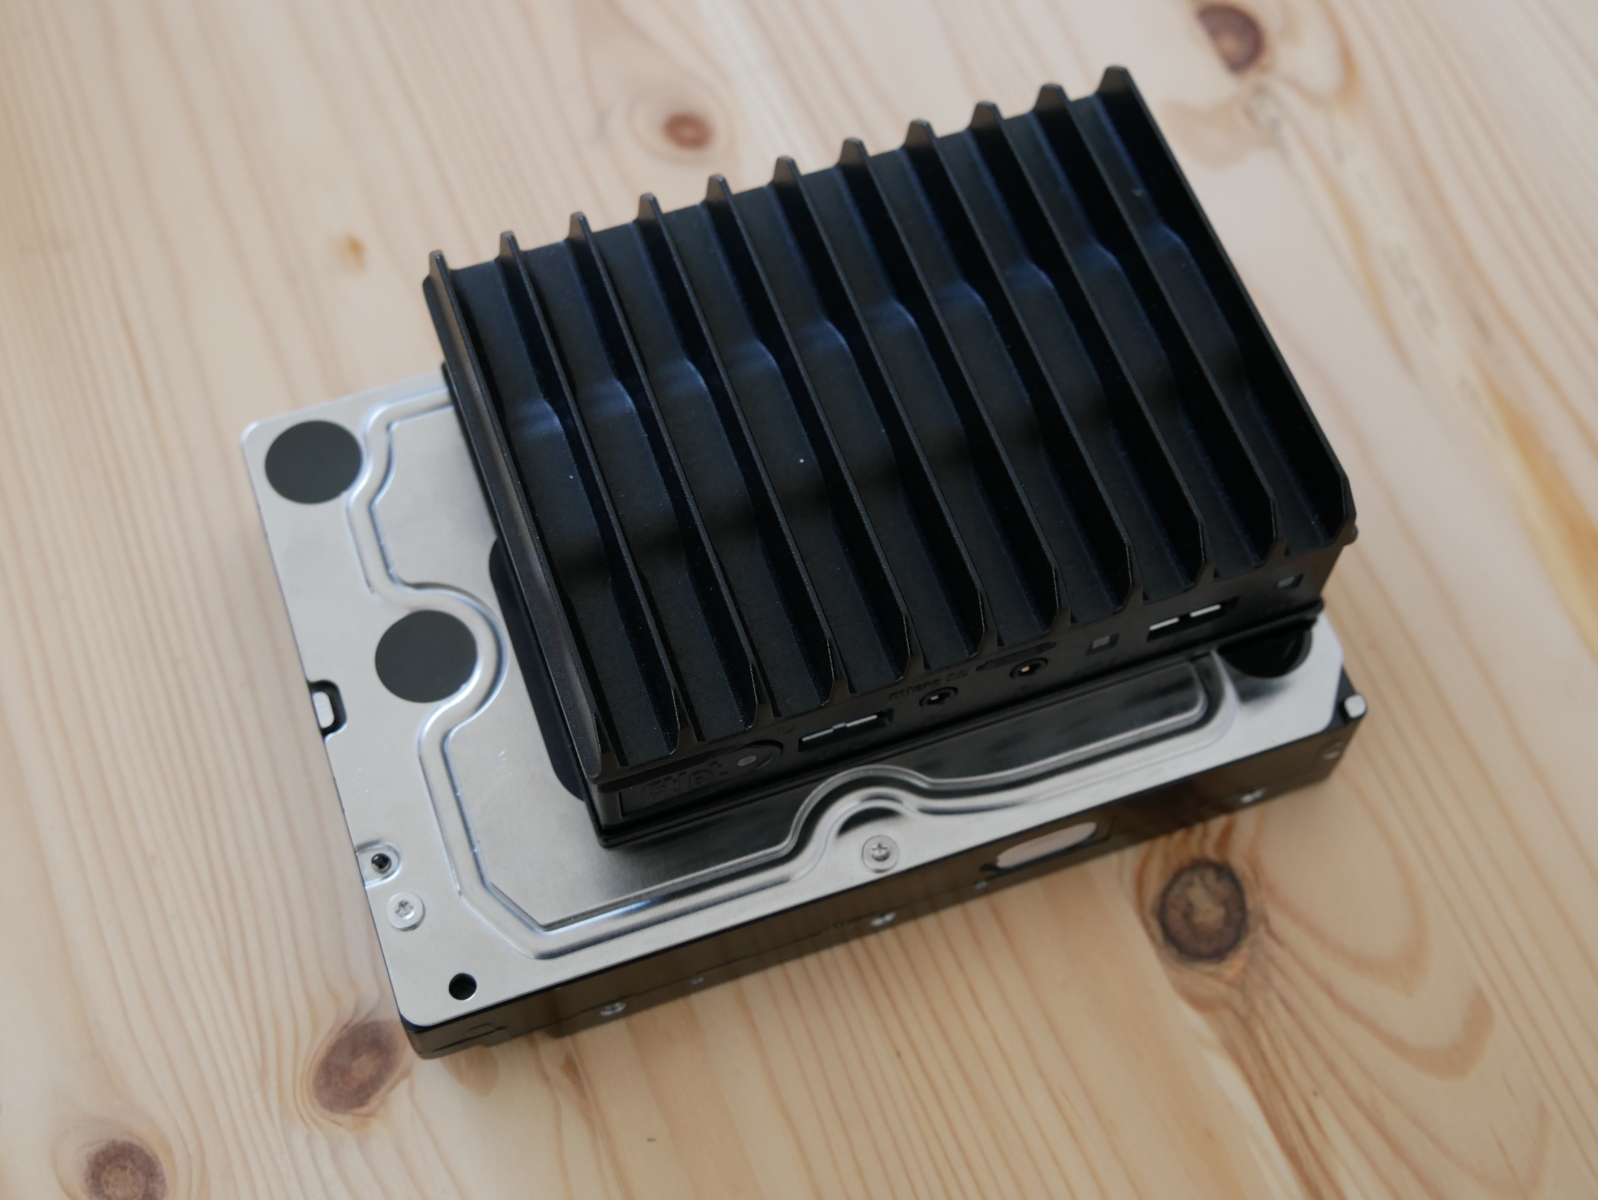
First we should discuss the elephant in the room, the fitlet2 is quite small. Here is the fitlet2 compared to a standard 3.5″ hard drive:

Disclaimer: My unit was provided by CompuLab to evaluate its potential as a target for coreboot, and to poke at their firmware (?). I received no compensation for this review, apart from the gratis hardware, and CompuLab did not have any input or influence on the review except to clarify my questions.

In the box
The fitlet2 is quite minimal, in the box you have:

  1. fitlet2
  2. 12V 3A power supply with plugs for AU/EU/UK/US
  3. Small sheet of information (FCC certification, manual download, etc)

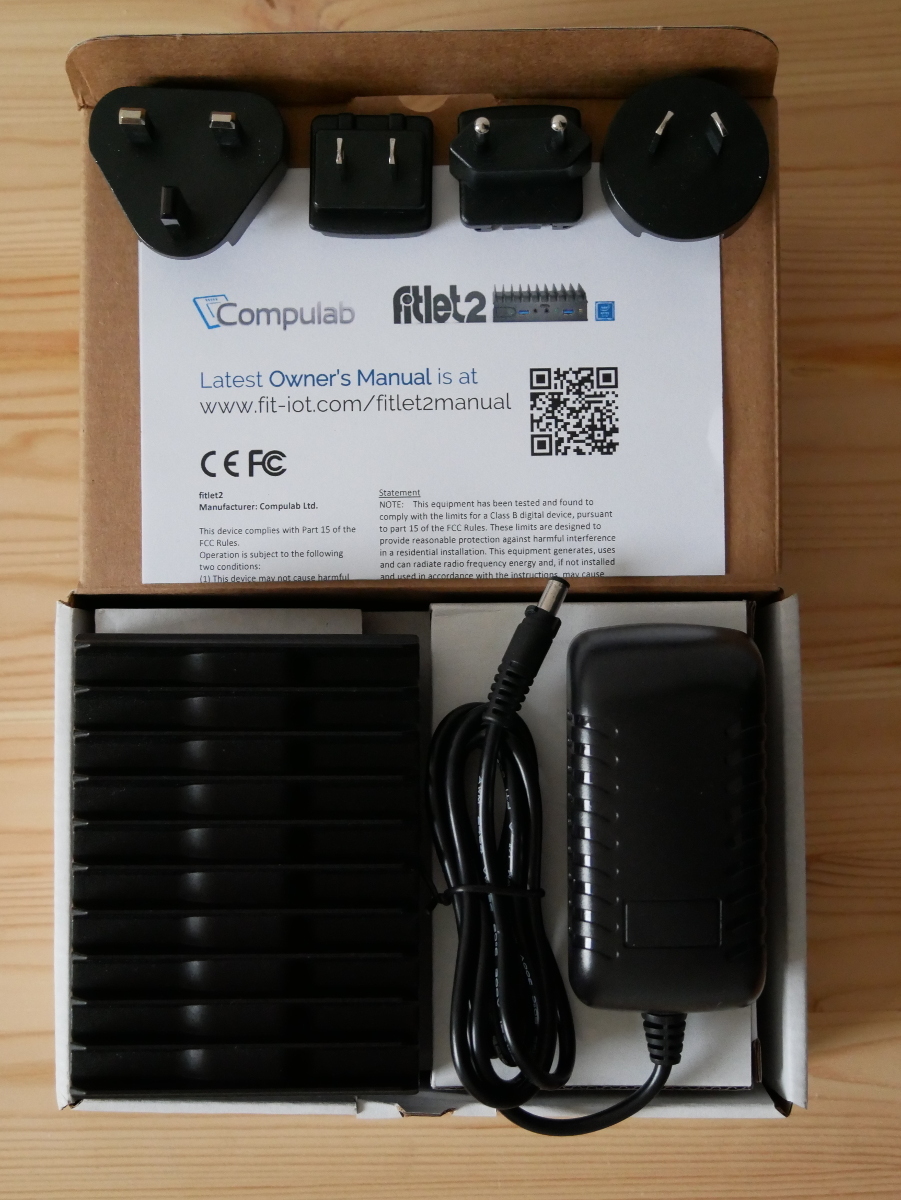
There are no other cables or accessories included in the box.

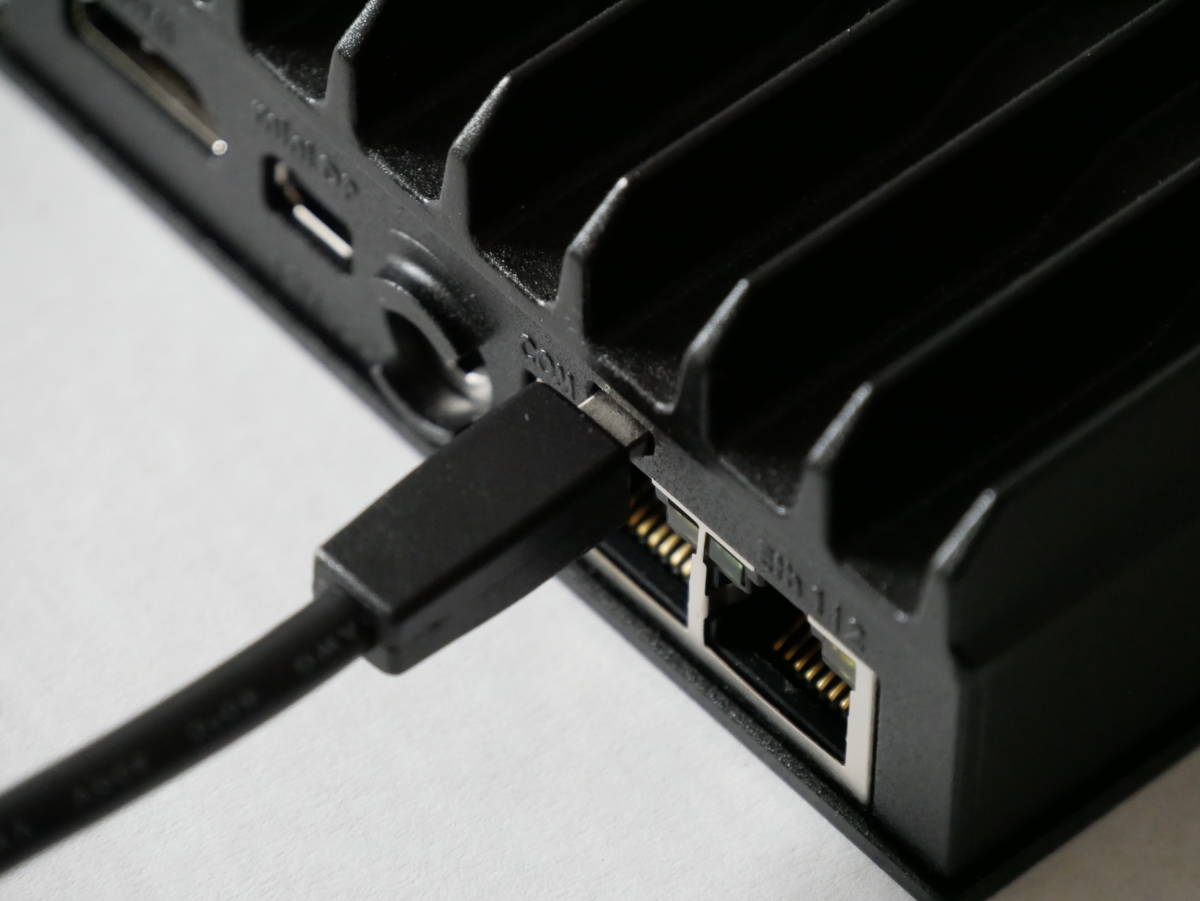
CompuLab use a small form factor port for RS-232, so if you plan to use the onboard RS-232 port, you will need to remember to order the accessory cables package during checkout.

I found the lack of rubber feet a bit strange. The bottom case is slightly elevated thanks to some protruding metal at each corner, but without the rubber feet the device is very slippery on most surfaces. It would be nice if CompuLab included rubber feet in the box that you could apply if you wanted to put the device on your desk.

Hardware

  • Intel Apollo Lake SoC: Atom x5-E3930, Celeron J3455, or Atom x7-E3950
  • Up to 16GB DDR3L-1866 Non-ECC (single SODIMM)
  • M.2 SATA storage
  • M.2 NGFF for WiFi or cellular modem
  • Dual Intel Gigabit Ethernet interfaces (Intel i211)
  • HDMI 1.4b and mini DisplayPort 1.2 outputs supporting 4K resolution
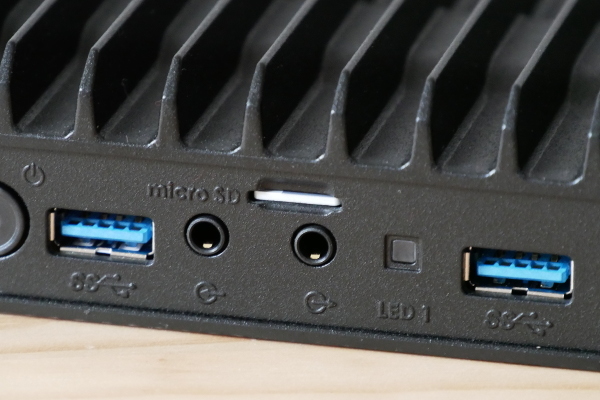
  • Two USB 2.0 and two USB 3.0 ports
  • MicroSD card reader
  • 3.5mm Audio in/out

The CPU in the fitlet2 is low-end. I personally don’t feel there’s any point in trying to talk up the capabilities of the Intel Atom series because they weren’t designed for performance. The Atom specializes as a low power CPU, with the Atom x5-E3930 consuming 6.5W, the Celeron J3455 consuming 10W, and the Atom x7-E3950 consuming up to 12W.

However, there are other areas where the fitlet2 surprises, such as the ability to accept a 16GB SODIMM. The Atom x5-E3930 and x7-E3950 also support ECC memory, although CompuLab confirmed that to offer the Celeron J3455 version they’ve removed ECC support from the motherboard. Be sure to check the fitlet2 RAM Qualified Vendor List (QVL) before purchasing.

Somewhat disappointingly, 4K@60Hz is not supported on both display outputs. This is an Intel Apollo Lake limitation, and will hopefully be resolved in their next generation SKUs. If you want to use 4K@60Hz via HDMI, you’ll need to buy an active adapter to convert the mini DisplayPort output to HDMI 2.0. DisplayPort MST is supported, so you can daisy chain DisplayPort MST capable displays. Unfortunately in my testing I was not able to daisy chain any combination of 4K displays. Daisy chaining two 1080p displays functioned normally. HDMI also functions while DisplayPort MST is active, so in my testing I was able to have three simultaneous 1080p displays driven by the fitlet2. I only have two 4K capable displays, so I’m not able to test all possible display combinations.

The micro SD reader is a nice inclusion, however the slot is so recessed in the front panel I found it impossible to insert or eject a micro SD card with my fingers. I ended up using another SD card to gently push the micro SD into the slot. Even with this helper, I found it difficult to insert and remove the micro SD card. This experience convinced me that if you’re going to use a micro SD card frequently with the fitlet2, an external reader is a must. If your plan is to use the micro SD as expandable storage that is rarely removed, then I don’t think that would be an issue.

My unit came with 4GB of RAM and a 64GB M.2 SATA SSD installed. The M.2 SSD (2242) in my unit is the Kingspec NT-64.

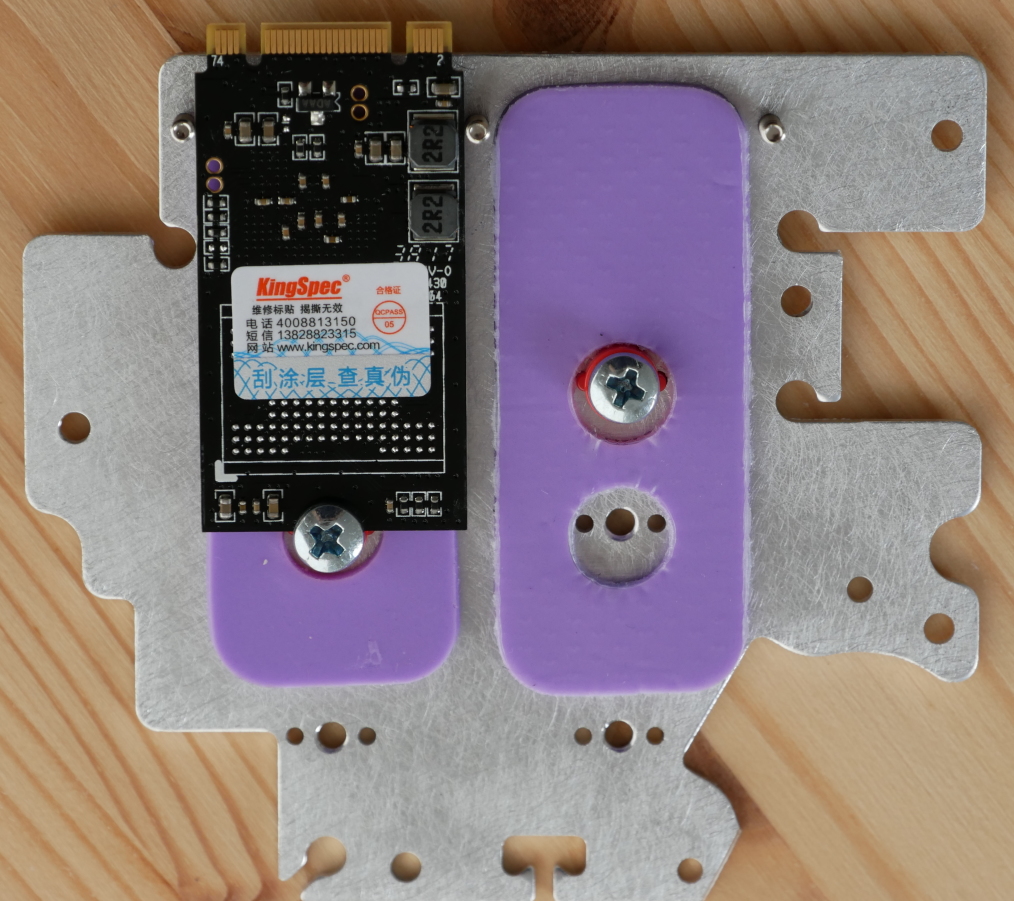
I have been using Kingspec SSDs in low performance applications (such as firewalls) since the beginning of 2017 and haven’t experienced any failures or issues, so while they’re relatively unknown in the West I don’t think they’re necessarily a bad choice. If you want to add a name brand M.2 SSD such as Transcend or ADATA you would probably be better off to buy the barebones model and add the SSD yourself.

The stock model only accepts 7-20V DC input. CompuLab does offer a build-to-order (BTO) version of the fitlet2 which accepts 9-36V DC input.

Software
CompuLab isn’t currently shipping the fitlet2 with any OS. But since the fit-iot website shows a render of the case in the Linux Mint colour scheme, it’s possible they will introduce a bundle with Linux Mint in the future as they have done with past products like the MintBox 2.

I do plan to test Linux, BSD, and Windows 10 IoT on the fitlet2. However I decided to wait on performing any extensive testing or benchmarks until patches for Meltdown and Spectre are available for all the above operating systems. Thoroughly evaluating an OS takes some time, so it may take me some months to get around to reviewing the fitlet2 with the above operating systems (and I have other projects in my pipeline too).

I’m also waiting to hear back from CompuLab on whether they plan to include support for Secure Boot. While some people are against Secure Boot, I think including the option to enable it and letting the user define their own keys would be a wise idea. For hardware intended to be installed in an industrial scenario and left unattended for years in the field, cryptographic verification of the entire boot process is vital to maintaining endpoint security.

Xubuntu 17.10 installs and runs nicely on the fitlet2. Average power consumption at the desktop is around 4.5W. There does appear to be a minor issue with Xubuntu not fully powering off the fitlet2, which CompuLab is aware of and will hopefully be resolved soon.

Conclusion
The fitlet2 is not the smallest x86 platform available (that honour would probably go to the Intel Compute Stick), but certainly offers a lot of I/O and expansion options for its diminutive size.

The fitlet2 is similar, though slightly less I/O rich, to the PC Engines APU2 (Quad Core, 2/4GB RAM, 3x GigE, 3x mPCIe, SD reader) while offering more convenient interfaces like HDMI and DisplayPort for people who don’t live in a 115200 baud world.

The dual Gigabit Ethernet interfaces would make it ideal as a low power firewall or an IoT gateway. Triple display support (DisplayPort MST & HDMI) out of the box could also see the fitlet2 used to power an informational or advertising display. Given CompuLab’s “IoT” marketing for the fitlet2, maybe there will even be a LoRaWAN FACET module available at some point in the future?

For consumers interested in an inexpensive, low power, and fanless PC, the fitlet2 is also functional as a desktop or a small server. It supports multiple displays and has USB3.0, but don’t expect miracles from the CPU or GPU. Worth noting is the stock model doesn’t support WiFi, though there are many inexpensive USB to WiFi adapters which are compatible with Linux and Windows, should you wish to add WiFi later. The fitlet2 also lacks USB Type-C which is supported by Apollo Lake and is slowly becoming more mainstream.

The fitlet2 comes with CompuLab’s standard 5 year return to depot warranty, but CompuLab also offers the Atom x5/x7 models with an extended 15 year availability. This is an important consideration for business customers who want stability in their supply chain or plan to develop and support long-lived products with the fitlet2 (e.g. CNC controllers, PLC applications, IoT gateway).

With barebone models starting from $154 I think the fitlet2 offers good value for the price. I feel CompuLab have a good offering here for the industrial segment as the fitlet2 is much more affordable than previous CompuLab products like the Intense PC, and competing products from companies like Logic Supply.

Debian on WD EX2100

The Western Digital My Cloud EX2100 is a dual-bay NAS based on the Marvell Armada 385 dual core ARMv7 CPU first released in 2015.

In terms of NAS devices available in 2017, it isn’t very special. I would say the only major differences between most other devices in the 2 bay category are:

  • Dual Gigabit Ethernet
  • Screwless and trayless hard drive installation

The dual GigE interfaces are what attracted me to the device over competitors like the Zyxel NAS326 and Western Digital’s own MyCloud EX2 Ultra.

Unlike some other NAS bundles, it’s possible to buy the EX2100 without drives, so you can add your own preferred 3.5″ SATA hard drives. I bought a refurbished unit for 110€, which seems typical for a device with these features. For some reason the resale price of these units has skyrocketed since I bought mine in mid-2017. I personally would not pay more than 150€ for such a device. If you get into the higher price range of these SOHO devices, you’re almost always going to get better value for your money building your own NAS using standard x86 components (such as the HP MicroServer G7/Gen 8/Gen 10) and a distribution like FreeNAS or OpenMediaVault.

Since the vendor supplied firmware is almost always a pile of unsightly hacks, I set to work investigating into how to put a better operating system on the EX2100. If you stick around to the end, you’ll see this particular product also has its share of unfortunate hardware design decisions…

kwboot
Before we get into anything about u-boot or the operating system, we need to talk about kwboot.

kwboot stands for “Kirkwood boot”

Kirkwood is an ARMv5 SoC from Marvell around 2008-2009 that started out in the SheevaPlug (what single board computers were before the creation of the Raspberry Pi) and sooner or later found its way into a lot of NAS devices like the D-Link DNS320 and the Zyxel NSA320.

Coming back to the near-past (2015), and we have the Western Digital EX2100/4100 which use the Marvell Armada 385/388 CPU, which is a dual-core ARMv7 design. However it was known that the Armada SoC could boot from serial because of the SolidRun ClearFog. But the ClearFog uses DIP switches to set the boot source, and most (all?) consumer devices lack these.

ClearFog Pro boot source selection DIP switches

It turns out it is possible to kwboot consumer devices based on the Armada 38x, however you need to apply this patch to kwboot to parse the response from the Armada CPU, which differs from the Kirkwood response. Unfortunately the patch broke Kirkwood compatibility, and was seemingly never merged into u-boot mainline. However, you can still apply it to the kwboot source in u-boot and compile kwboot for use with Armada CPUs.

Once you have patched kwboot, you can use it to test new versions of u-boot via a USB to uart adapter:
$ ./kwboot -f -t -B 115200 /dev/ttyUSB0 -b u-boot-uart.bin -s 0 -q 1

There are some synchronization issues with the magic sequence, so it often takes several attempts before successfully loading via kwboot. A dead giveaway that you need to power cycle the device and try again is when you immediately see u-boot output in the console instead of “Sending boot image…”

A successful attempt should look similar to the following:
$ ./kwboot -f -t -B 115200 /dev/ttyUSB0 -b u-boot-a38x-Yosemite_2014T3_PQ-nand-uart.bin -s 0 -q 1
Sending boot message. Please reboot the target...-�$�"Ufw�$�"U����$
Dfw�$�"U�\�$�"U����$�DUf�$�"Uw��"U����$4"U���$�"Uw�$�"U���$�DUf|fD�&T���$�"U�E�$�"Df3DD�DU�E7$�"U����$4"U���$�"U�E�4"U�/7@� ��$DUw�$�"U����$�DUff�$�"D��fD$U��
Sending boot image...
0 % [......................................................................]

Once kwboot works, you can safely proceed to testing u-boot modifications without the risk that you brick your device, as kwboot runs code in memory without modifying the contents of NAND.

u-boot
Unfortunately mainline u-boot doesn’t support this device, although similar devices are supported, such as the Turris Omnia (Armada 385) and Solidrun Clearfog Pro (Armada 388). It’s no surprise that attempting to kwboot a build of mainline u-boot for these targets on the EX2100 doesn’t work. So currently we have no choice but to use the u-boot source from Western Digital’s GPL archive.

The stock u-boot on the device does not support saveenv. Without modifying NAND, it is possible to boot Linux from USB, however this requires using the uart console and manually entering the boot parameters on each boot.

Naively modifying the WD u-boot source to enable the saveenv command results in corruption of the kernel uImage since someone at WD set the environment offset to 5MB and this is beyond the u-boot partition, corrupting the uImage.

However it is possible to modify the WD u-boot source to save environment variables within the 5MB allocated for u-boot. This requires reflashing u-boot to the device. Before you replace the stock u-boot on your device, you should take a backup of the u-boot region of flash. This can be done from within the Western Digital firmware, but requires a USB to UART adapter and a header soldered to the PCB:
# nanddump --noecc --omitoob -f mtd0.bin /dev/mtd0

Remember to copy this file somewhere off-device, such as a USB key, for safe keeping!

The general steps to replace the stock u-boot are:

  1. kwboot a modified u-boot which saves environment variables within u-boot region
  2. Inside u-boot, run saveenv
  3. Boot Debian from USB or SATA
  4. Dump u-boot env to a file (using nandread)
  5. Erase u-boot portion of mtd0 (using flash_erase)
  6. Flash new u-boot (using nandwrite)
  7. Restore u-boot environment variables (using nandwrite)
  8. Reboot

Dump the u-boot env to a file:
# nanddump -s 0x100000 -l 0x80000 -f ubootenv.bin /dev/mtd0

Erase the u-boot portion of mtd0 and flash the new u-boot to NAND:
# flash_erase /dev/mtd0 0 8
# nandwrite -p /dev/mtd0 u-boot-a38x-Yosemite_2014T3_PQ-nand.bin

Restore u-boot environment variables:
# nandwrite -p /dev/mtd0 -s 0x100000 ubootenv.bin

Integrated MCU
Western Digital decided to use an external microcontroller to handle certain system management functions such as fan control, LED control, and power on/off.

Sadly the microcontroller uses a proprietary and undocumented protocol for communication, and as it turns out this protocol can differ even between Western Digital products!

For the Western Digital EX2100 and EX4100, the integrated microcontroller communicates on ttyS1 at 115200n8, unlike other Western Digital NAS products whose microcontroller communicates at 19200n8.

Thankfully, some of the commands are common, so once communication with the microcontroller has been established, fan control and temperature monitoring are functional. Fan control and temperature monitoring are available through a userspace daemon called “mcm-daemon” (MyCloud Mirror daemon). I have forked the mcm-daemon repository on GitHub and made modifications to support the EX2100/4100.

LED control and power on/off are still a work in progress as the reverse engineered commands used on other WD products do not work on the EX2100/4100.

Debian
The user bodhi at Doozan forums does a great job of providing pre-built Debian images for a variety of Marvell Armada based NAS devices.

Usually I would link to the excellent instructions bodhi normally writes for installing Debian, but since they don’t have the EX2100, writing the instructions fell to me.

But sadly I haven’t got installation instructions written because I’ve bricked my EX2100.

Weltrend WT61P8
Let’s revisit this mystery microcontroller in charge of so many tasks in the EX2100.

Well, after reading that Western Digital My Cloud products contained a backdoor and multiple vulnerabilities I thought I would go and update the WD firmware before continuing to write the Debian installation instructions. The WD firmware resides on the built in 512MB of EMMC, while Debian lives on a USB device, so the installation of Debian does not replace the original WD firmware.

During the WD update process I noticed that it was also updating the firmware of the Weltrend:

16479 root 6624 S /var/www/cgi-bin/system_mgr.cgi
16480 root 2560 S sh -c cd /usr/local/upload/;upload_firmware -a -n 'nas-new-firmware' >/dev/null;cd /
16481 root 4544 S upload_firmware -a -n nas-new-firmware
19436 root 49120 R mcu_upgrade -r -f /tmp/uP_0.bin
19552 root 2720 R ps ax

How curious! Since the Weltrend is very undocumented I was eager to learn more about the firmware it runs.

I found out a good deal more than I’d expected. Firstly, the mcu_upgrade binary contains some interesting strings. Here is a short sample of strings in the binary:

WT61P8
Enable ISP
Set ISP
Erase
Page Erase
Program
Set Address High Byte
Finish

The MCU firmware also has some very interesting strings. Here is a short sample of strings in the firmware:

nick 1111
nick 2222
nick 3333
nick 4444
MyCloudDL2000
Cannot Copy
from Camera
Cannot Move
Storage
Almost Full
Limit Reached
nick pwr on
nick pwr off 1
nick pwr off wol
Welcome to
RTC_ALARM pwr on

Googling the part number “WT61P8” lead to a very interesting datasheet (PDF) describing the microcontroller in detail.

What I found from the datasheet was… not anything I expected to find.

It’s a Turbo 8052 CPU with ~48KB of built-in EEPROM (this is my guess based on the part number and size of firmware mcu_upgrade was sending) and it’s a “Flat Panel Display Control Sub-MCU”

Most information about Weltrend microcontrollers is on Russian language forums dedicated to TV repair. The most common use of this MCU is in Samsung TVs for power management, since it includes an IR receiver and HDMI CEC capabilities.

They do support ISP (In-system Programming) via I2C, if you have the right hardware. There are quite a few Russian articles and YouTube videos on how to program these chips in TVs.

Conclusion

After reading about WD’s numerous firmware vulnerabilities and a back door, which were also present in D-Link NAS products (implying a shared code base or same third party contractor), and then learning that the microcontroller in charge of power management for the EX2100 (and other My Cloud products) was intended for power management in LCD TVs:

My final $0.02: this thing is an utter bodge job in both hardware and software! Don’t buy one of these. It doesn’t matter that can be persuaded to run Debian, it’s terrible value for the price.

You’re far better off getting an older PC and running FreeNAS or OpenMediaVault. Older corporate tower PCs with 2nd or 3rd gen Intel processors like the Dell Optiplex line can easily be purchased for under $150 from places like eBay.

If power consumption is really important to you, then I would recommend something like the Rock64 which has Gigabit Ethernet and excellent USB 3.0 performance with Armbian. It also comes with more RAM than the EX2100 (1/2/4GB while EX2100 has only 1GB) and is a quad core aarch64 instead of dual core armv7!

Best of all, an older PC or Pine64 is going to be cheaper than the EX2100 (or ludicrously more expensive 4 bay EX4100) anyway.

If I ever manage to restore the Weltrend firmware rest assured there will be a follow up article with both the journey of unbricking and instructions to install Debian. Until then, I’m going to take the HDDs I planned to use in the EX2100 and build a FreeNAS in an old PC. ✌️