Tag Archives: debian

Debian on WD EX2100: Installation instructions

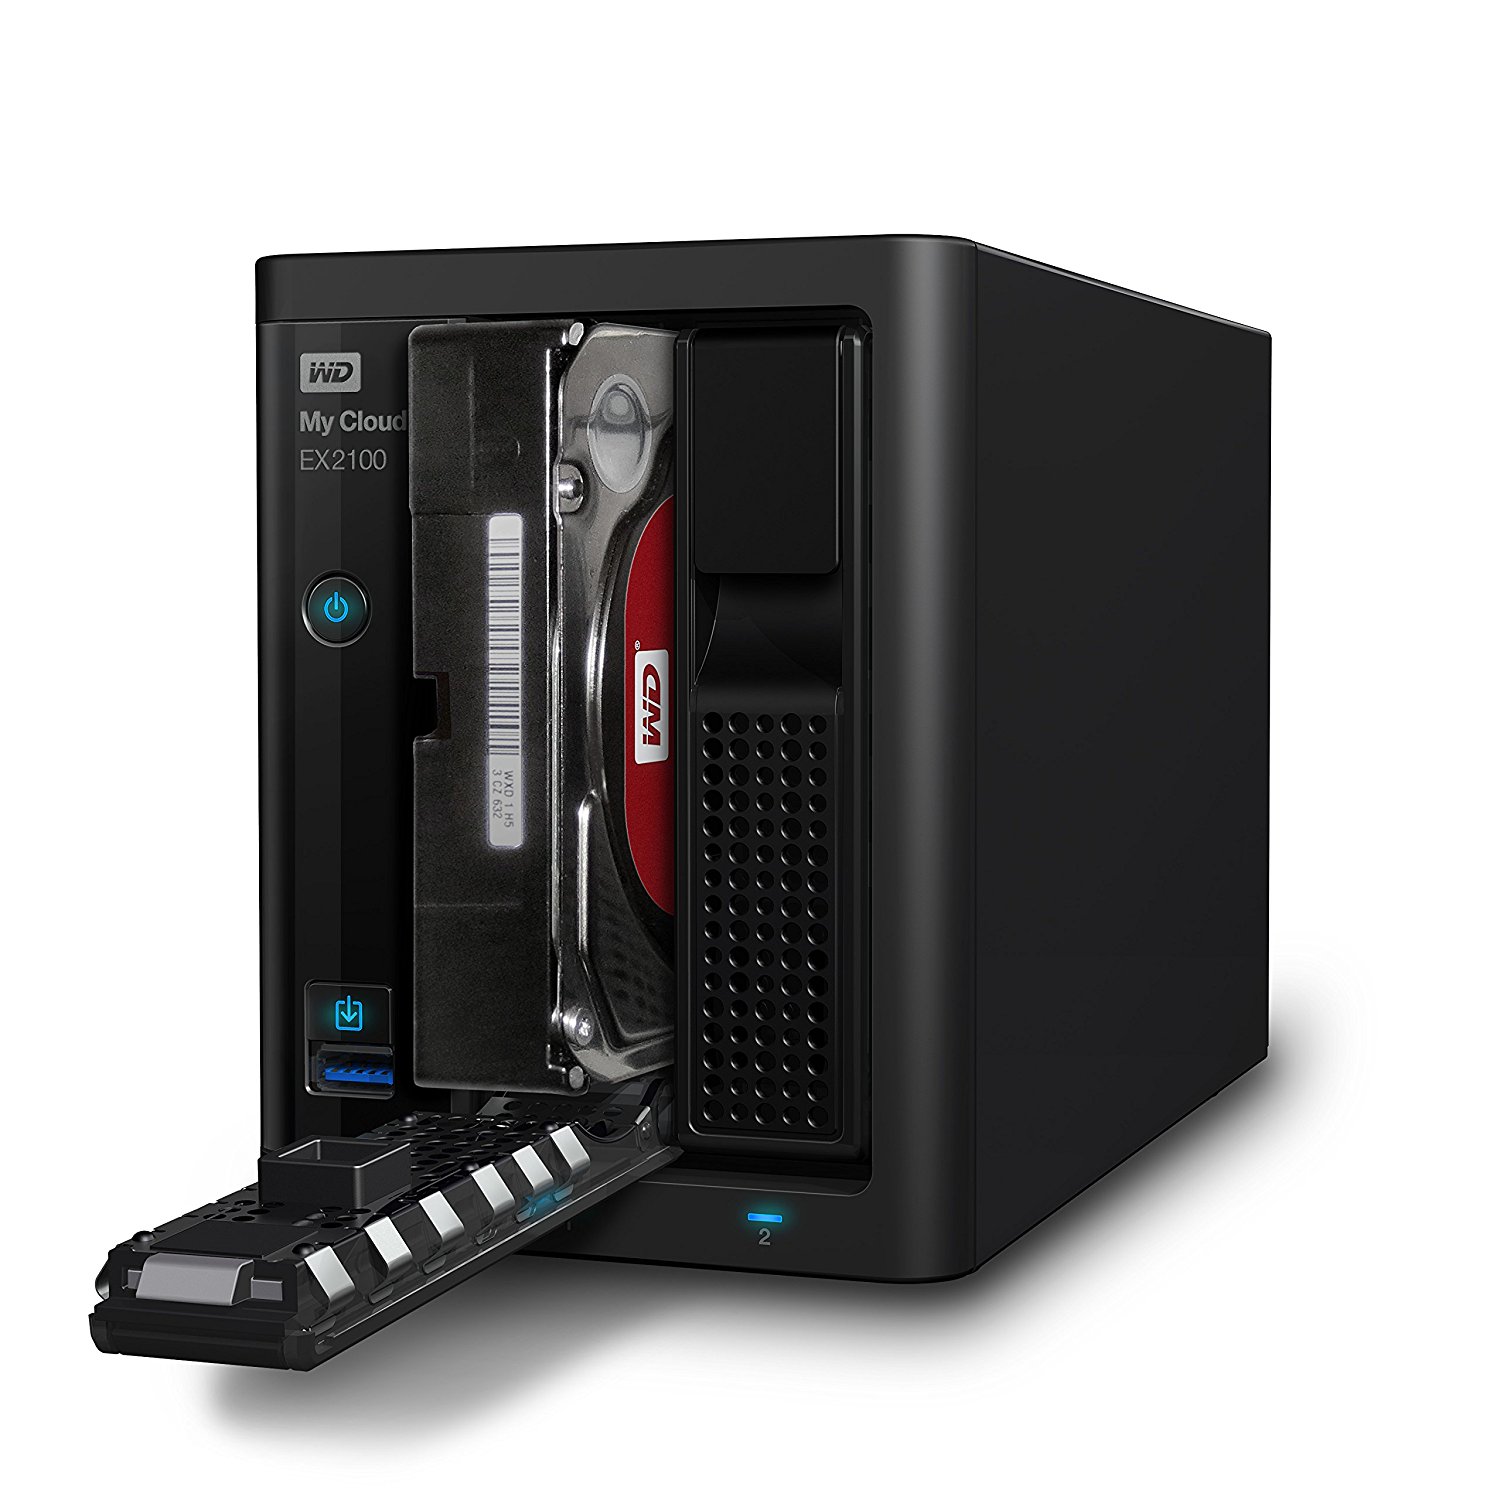
In the last article on this topic, I unbricked my Western Digital My Cloud EX2100 NAS and said I would provide instructions on how to install Debian. There are partial instructions for how to replace the stock u-boot with one that is capable of booting Debian from a USB stick, but following those instructions requires slightly more knowledge about how the boot process works and omits some important details.

Now that I have the EX2100 working again, I thought it would be good to provide a set of complete, concise installation instructions for anyone else with this hardware who is interested in running Debian (or another Linux) on it. These instructions are also available on the Doozan forum.


Uart
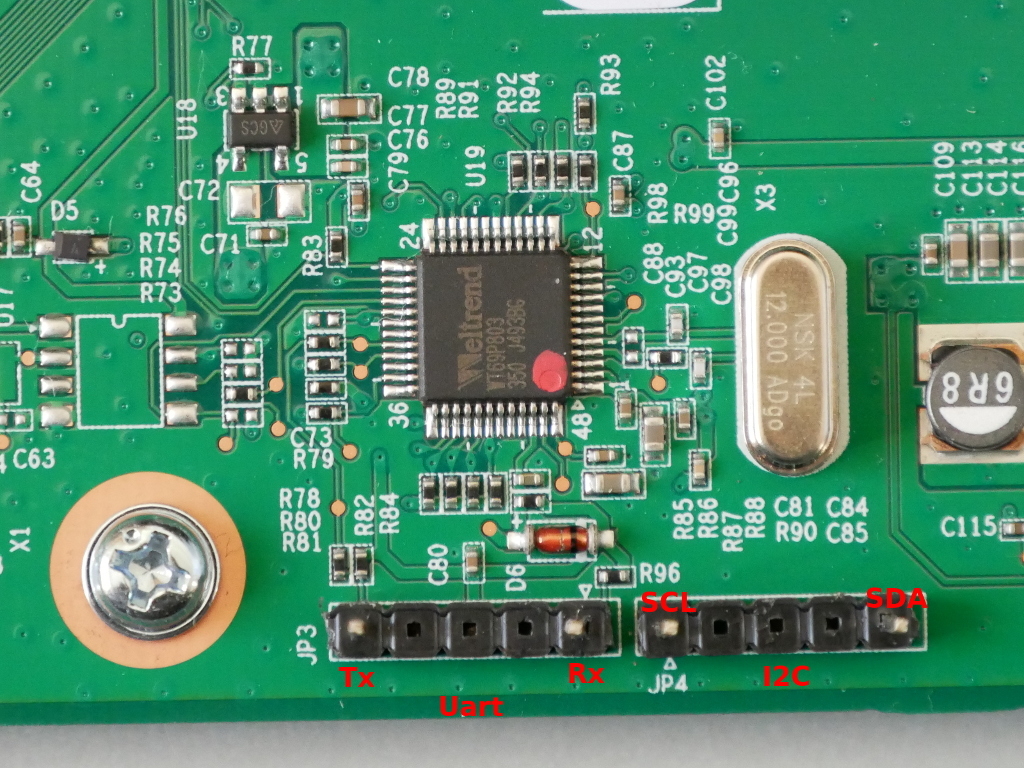
Before we begin installation of Debian, you will need a working uart connection to the EX2100.

There are two possible methods to connect via uart:

  1. solder a header to JP1 the PCB to expose Rx, Tx, and Gnd. This will require opening the enclosure and removing the PCB, which will void your warranty
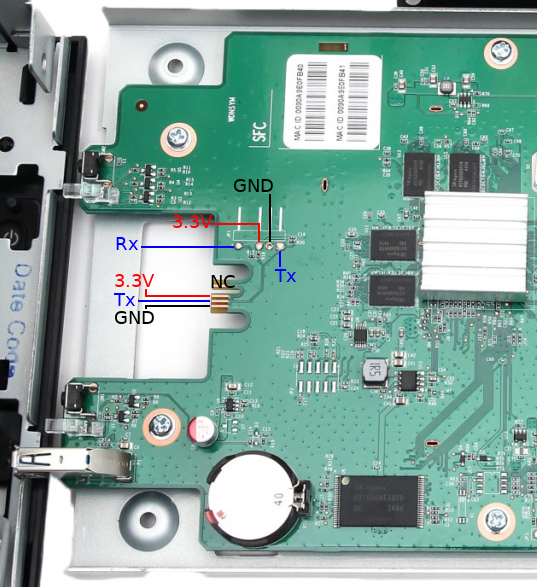
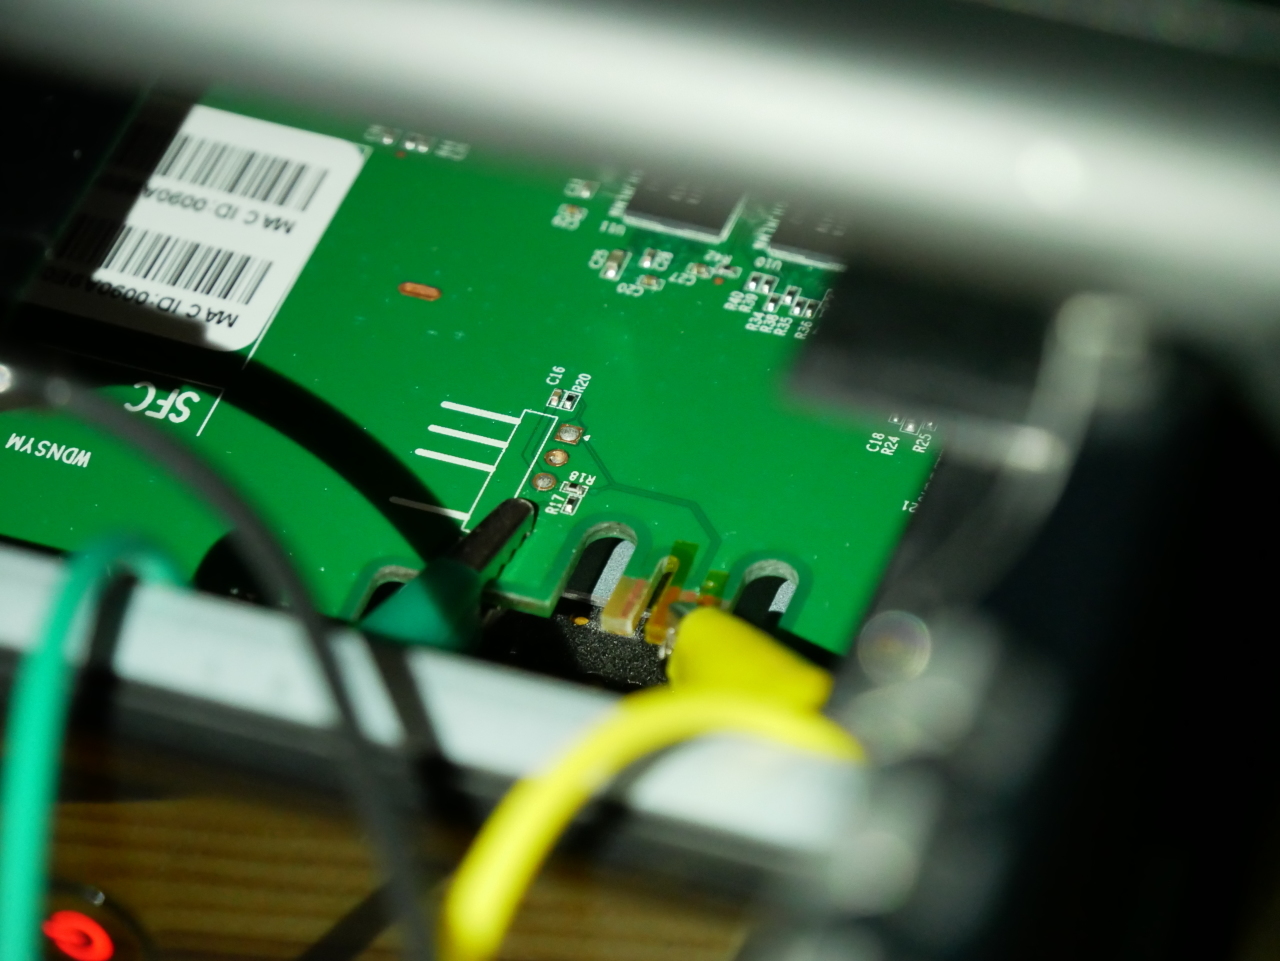
  2. Using kapton tape (tweezers, and patience), cover the 3.3V and GND pads on the front of the PCB. Use alligator clips to attach to the Tx contact, the Rx pad from JP1, and the chassis for ground. This method is not as reliable as soldering a header to JP1, but does not require disassembly and soldering as the area can be accessed by opening the hard drive bay doors

Test the connection by powering up the EX2100 with a USB to uart adapter or something like a Raspberry Pi. The uart operates at 115200n8.

You should immediately see output from u-boot (see sample below). If you don’t see any output, check your connections and ensure that you have not reversed the uart Tx/Rx.

Uart output

BootROM - 1.73
Booting from NAND flash

General initialization - Version: 1.0.0
Detected Device ID 6820
High speed PHY - Version: 2.0

Load WD Yosemite Serdes Config:
board SerDes lanes topology details:
| Lane # | Speed | Type |
--------------------------------
| 0 | 06 | SATA0 |
| 1 | 05 | PCIe0 |
| 2 | 06 | SATA1 |
| 3 | 05 | USB3 HOST1 |
| 4 | 05 | USB3 HOST0 |
| 5 | 00 | SGMII2 |
--------------------------------
PCIe, Idx 0: detected no link
High speed PHY - Ended Successfully
DDR3 Training Sequence - Ver TIP-1.26.0
mvSysEnvGetTopologyUpdateInfo: TWSI Read failed
DDR3 Training Sequence - Switching XBAR Window to FastPath Window
DDR3 Training Sequence - Ended Successfully
BootROM: Image checksum verification PASSED

__ __ _ _
| \/ | __ _ _ ____ _____| | |
| |\/| |/ _` | '__\ \ / / _ \ | |
| | | | (_| | | \ V / __/ | |
|_| |_|\__,_|_| \_/ \___|_|_|
_ _ ____ _
| | | | | __ ) ___ ___ | |_
| | | |___| _ \ / _ \ / _ \| __|
| |_| |___| |_) | (_) | (_) | |_
\___/ |____/ \___/ \___/ \__|
** LOADER **


Prepare a USB with the Debian rootfs for mvebu
For this step you will need a USB mass storage device of at least 2GB. We will format the device, so ensure you do not have any important data on it. The device must be USB 2.0 as USB 3.0 is not supported in the EX2100 u-boot.

Format the device with a single ext3 partition. Double check the device before proceeding as parted will erase and format the device without confirmation!

sudo parted --script /dev/sdX \ mklabel msdos \ mkpart primary ext3 1MiB 100%
sudo mkfs.ext3 -L rootfs /dev/sdX1

Download the latest Debian rootfs from the Doozan forums.

Now, mount the new partition and extract the Debian rootfs:

ROOTFSDIR=$(mktemp -d)
sudo mount /dev/sdX1 $ROOTFSDIR
sudo tar -C $ROOTFSDIR -jxvf Debian-4.12.4-mvebu-tld-1-rootfs-bodhi.tar.bz2

You can download the EX2100 DTB from the kernel image Doozan user bodhi publishes. Inside the kernel archive is another archive containing the DTBs (linux-dtb-$(kernelversion).tar). Extract the archive containing DTBs, and append the EX2100 DTB to the kernel:

tar -C $ROOTFSDIR/boot/dts/ -xvf linux-dtb-4.14.1-mvebu-tld-1.tar
cd $ROOTFSDIR/boot/
cat zImage dts/armada-385-wd-ex2100.dtb > zImage.fdt
mkimage -A arm -O linux -T kernel -C none -a 0x00008000 -e 0x00008000 -n Linux-4.12.4-mvebu-tld-1 -d zImage.fdt uImage

Download u-boot for the EX2100 from here. Extract the archive:

tar -zxvf u-boot-a38x-Yosemite_2014T3_PQ.tar.gz

Copy the file u-boot-a38x-Yosemite_2014T3_PQ-nand.bin to the rootfs:

cp u-boot-a38x-Yosemite_2014T3_PQ-nand.bin $ROOTFSDIR/root/

Unmount the USB device from your computer:

sudo umount $ROOTFSDIR

Put the USB device in the rear USB port on the EX2100. The front USB port cannot be used for booting as it is not powered during u-boot execution.


kwboot the EX2100
Now that you have a serial connection to the EX2100 and a USB device prepared with the Debian rootfs, mvebu kernel, and dtb for the EX2100 it’s time to start installing Debian.

You must use a modified version of kwboot to load u-boot to the EX2100 via uart. You can obtain the modified kwboot binary for amd64 from here, and kwboot for armhf from here.

You will be kwbooting a modified version of u-boot which can save environment variables.

With the EX2100 powered off and unplugged, execute kwboot (note this is one line):

./kwboot -f -t -B 115200 /dev/ttyUSB0 -b u-boot-a38x-Yosemite_2014T3_PQ-nand-uart.bin -s 0 -q 1

Plug the DC power into the EX2100. If the handshake is successful, kwboot should display a loading screen:

Sending boot message. Please reboot the target...-�$�"Ufw�$�"U����$
Dfw�$�"U�\�$�"U����$�DUf�$�"Uw��"U����$4"U���$�"Uw�$�"U���$�DUf|fD�&T���$�"U�E�$�"Df3DD�DU�E7$�"U����$4"U���$�"U�E�4"U�/7@� ��$DUw�$�"U����$�DUff�$�"D��fD$U��
Sending boot image...
0 % [......................................................................]

If the handshake was unsuccessful, you will see normal u-boot output as you should have seen in the “Uart output” section above. Repeat the procedure until you see kwboot say “Sending boot image…” followed by loading u-boot via uart. This takes some time (~90 seconds).

After the u-boot image has been loaded via kwboot, it will boot normally (as you saw in “Uart output” section above).

When the uart output gets to the following section:

Enable HD1
Enable HD2

Begin pressing the 1 key to interrupt the automatic boot process. If you were successful you should now have a u-boot prompt:

Enable HD1
Enable HD2
Net:
| port | Interface | PHY address |
|--------|-----------|--------------|
| egiga0 | RGMII | 0x00 |
| egiga1 | RGMII | In-Band |
| egiga2 | SGMII | 0x01 |
egiga0 [PRIME], egiga1, egiga2
Hit any key to stop autoboot: 0
Marvell>> 1111


Set u-boot environment parameters
Press ctrl+c to clear the extra 1 characters and enter the following:

setenv bootdev usb
setenv device '0:1'
setenv load_initrd_addr 0x2900000
setenv load_image_addr 0x02000000
setenv load_initrd 'echo loading uInitrd ...; ext2load $bootdev $device $load_initrd_addr /boot/uInitrd'
setenv load_image 'echo loading Image ...; ext2load $bootdev $device $load_image_addr /boot/uImage'
setenv usb_set_bootargs 'setenv bootargs "console=ttyS0,115200 root=/dev/sda1 rootdelay=10 $mtdparts earlyprintk=serial"'
setenv usb_bootcmd 'echo Booting from USB ...; setenv fdt_skip_update yes; usb start; run load_image; run load_initrd ; run usb_set_bootargs; bootm $load_image_addr $load_initrd_addr'
setenv bootcmd_usb 'usb start; run usb_set_bootargs; run usb_bootcmd; reset'
printenv
run bootcmd_usb

If you performed the previous steps correctly, the EX2100 should now boot Debian from the USB device attached to the rear USB port.


Make a backup of NAND flash
For the changes in u-boot to be persistent, we need to write the modified version of u-boot to NAND.

However, before we do this, we will make a backup of the contents of NAND before modifying it. When booted into Debian, run the following commands:

mkdir nand_backup
cd nand_backup
nanddump --noecc --omitoob -f mtd{0,7}.bin /dev/mtd{0,7}

Make sure you make a copy these backups also in another location!!!


Installing the modified u-boot
Once you have taken a backup of the NAND contents, poweroff the EX2100. Remove the USB and copy the mtd backups you made to your computer for safekeeping.

When you have finished this, follow the instructions again in the “kwboot the EX2100” section but stop at the “Set u-boot environment parameters” section.

This time we will modify the u-boot environment:

setenv bootdev usb
setenv device '0:1'
setenv load_initrd_addr 0x2900000
setenv load_image_addr 0x02000000
setenv load_initrd 'echo loading uInitrd ...; ext2load $bootdev $device $load_initrd_addr /boot/uInitrd'
setenv load_image 'echo loading Image ...; ext2load $bootdev $device $load_image_addr /boot/uImage'
setenv usb_set_bootargs 'setenv bootargs "console=ttyS0,115200 root=/dev/sda1 rootdelay=10 $mtdparts earlyprintk=serial"'
setenv usb_bootcmd 'echo Booting from USB ...; setenv fdt_skip_update yes; usb start; run load_image; run load_initrd ; run usb_set_bootargs; bootm $load_image_addr $load_initrd_addr'
setenv bootcmd_usb 'usb start; run usb_set_bootargs; run usb_bootcmd; reset'
saveenv
run bootcmd_usb

You will then proceed to boot Debian again.

Once in Debian, create /etc/fw_env.config:

echo “/dev/mtd0 0x100000 0x80000 0x20000 4” > /etc/fw_env.config

Check that fw_printenv is able to read the u-boot environment you just saved in the kwboot’d u-boot:

root@debian:~# fw_printenv
CASset=max
MALLOC_len=5
MPmode=SMP
autoload=no
baudrate=115200
boot_order=hd_scr usb_scr mmc_scr hd_img usb_img mmc_img pxe net_img net_scr
bootargs=root=/dev/ram console=ttyS0,115200

If you see the u-boot environment variables returned, then the modified u-boot successfully wrote the environment variables to 0x100000

Verify that you are able to write to the u-boot section of NAND (this should be enabled in the EX2100 dtb):

root@debian:~# mtd_debug info /dev/mtd0
mtd.type = MTD_NANDFLASH
mtd.flags = MTD_CAP_NANDFLASH
mtd.size = 5242880 (5M)
mtd.erasesize = 131072 (128K)
mtd.writesize = 2048 (2K)
mtd.oobsize = 64
regions = 0

If instead you see “mtd.flags = MTD_CAP_ROM” then you cannot flash u-boot using the dtb you have booted with. You can download the dts for the EX2100 and build the dtb for your kernel.

If you saw MTD_CAP_NANDFLASH, then proceed to backup the u-boot environment variables to a file:

nanddump --noecc --omitoob -s 0x100000 -l 0x80000 -f ubootenv.bin /dev/mtd0

Erase the u-boot portion of NAND, flash the modified u-boot, and restore the environment variables:

flash_erase /dev/mtd0 0 8
nandwrite -p /dev/mtd0 u-boot-a38x-Yosemite_2014T3_PQ-nand.bin
nandwrite -p /dev/mtd0 -s 0x100000 ubootenv.bin


That’s it, you should be finished. Shutdown the EX2100 and exit kwboot. Using a standard serial console like screen or minicom, connect to the uart if you want to monitor the boot process.

Now when you power the EX2100 it should boot Debian from the USB device plugged into the rear USB port, if it is present. If the USB device is not present, u-boot will fall back to booting the WD firmware from internal flash.

Note that the Western Digital firmware is not fully functional unless you allow it to format your hard drive(s). If you format the drives with the Western Digital firmware and run Debian from USB, then the device should function regardless of the running firmware. If you choose to partition the drives yourself and usually boot Debian, then the WD firmware won’t be very functional as the hard drive(s) are not formatted in the expected layout.

Western Digital Weltrend MCU

When we left off in my last post about the Western Digital EX2100, I had corrupted the firmware on the microcontroller responsible for managing mundane system tasks like bringing the main ARM SoC out of reset. This unfortunate bout of curiosity had left me with a fancy brick instead of a NAS.

To recap from the last article, the EX2100 uses a Weltrend WT61P8 series MCU (despite being labelled WT69P803) intended for use in flatpanel televisions. The WT61P8 has a turbo 8052 CPU and is primarily intended for flatpanel television power management as it supports HDMI CEC and Infrared.


Finding the ISP

Consulting the WT61P8 datasheet (PDF) I was able to trace the headers JP3 and JP4 on the EX2100 PCB:

JP3:
Pin 1: Uart Tx (WT61P8 pin 32)
Pin 5: Uart Rx (WT61P8 pin 31)

JP4:
Pin 1: SCL (WT61P8 pin 23)
Pin 5: SDA (WT61P8 pin 22)


If I can be grateful for one thing, it is that this microcontroller is frequently used in Samsung televisions and Russians are very resourceful at repairing and modifying televisions. Through a variety of Russian language forums and with a lot of Google translate, I was able to find that the WT61P8 supports ISP via I2C and that there is software available to flash it. The “Postal2” software is designed for dumping and flashing firmware from televisions, and as the WT61P8 is used in televisions it is supported.

Now my options were either:

  1. Postal2, which is intended to be used with a parallel port to I2C adapter
  2. RT809F ISP programmer, which costs around $70

Since I did not really want to spend money on the RT809F, having no other use for it, I decided to try Postal2.


A trip back to the 1970s

However I faced a problem: Postal2 requires an LPT to I2C adapter, and this is not an adapter you’ll find anyone selling on AliExpress or eBay, so I would have to make it myself.

After searching for schematics, and building one non-functional adapter, I was able to find a correct schematic for an LPT to I2C adapter that people were successfully using with Postal2:

Use 3.3V instead of 5V as the WT61P8 operates at 3.3V

Luckily I already had some CMOS inverters from another project, so I only had to order resistors and an LPT connector. After much soldering, and a trip down nostalgia lane to another era of computing, I finished the adapter:

The micro USB port is for power, with a 5V to 3.3V linear regulator. An equal mix of modern and ancient connectors are present in this adapter.

Then I had to find a PC with a parallel port and install Windows 7 x86. Postal2 seems to be completely incompatible with all x64 versions of Windows.


Finally finished with the prerequisite tasks, I started Postal2 and tried to read the current EEPROM contents from the Weltrend using the SDA/SCL lines on JP4 within the EX2100:

It works!

Examining the downloaded firmware with the firmware file I managed to save from the EX2100 as it was updating, it was clear to me what had happened:

After analyzing the downloaded firmware, it appears mcu_upgrade put the Weltrend into ISP mode and erased a majority of the internal EEPROM, leaving [I assume] only the bootloader. For some reason, mcu_upgrade did not write the firmware back to the Weltrend after erasing. I won’t speculate if my strace on mcu_upgrade was responsible for it… When I reset the EX2100 the Weltrend had no firmware to run, and didn’t bring the main Armada CPU out of reset, resulting in a brick.

Since the bootloader portion of the firmware I dumped and the binary firmware I had from the EX2100 update were the same, I felt confident to upload the firmware binary to the Weltrend using Postal2. My logic: cannot be any more broken than it is now ¯\_(ツ)_/¯


I would not consider the result a complete success. The Weltrend did have a valid firmware again, and it was functional enough to bring the main Armada CPU out of reset. Unfortunately (or predictably) the binary firmware I recovered from the Western Digital update package does not appear to be specifically for the EX2100.

Here is the uart output of the Weltrend during boot before I bricked it:
Yosemite Uart test
nick 2222
nick pwr on
Check_SYSTEM_Command=11
PwrOnCause=10

And here is the uart output after flashing the uP_0.bin I extracted from the EX2100 update archive:
nick 4444
Check_SYSTEM_Command=11
PwrOnCause=00
nick pwr off wol

The codename for the EX2100 is “Yosemite” and unfortunately this string does not exist in the binary firmware uP_0.bin I extracted from the EX2100 firmware update. Looking at the strings in the firmware, it appears that the firmware is intended for the “MyCloudDL2000” (a product that doesn’t exist). There is a DL2100 which is a “Pro” version of the EX2100, using an Intel CPU instead of the Marvell Armada.

Unfortunately the behaviour of the Weltrend with the extracted firmware is different enough that u-boot hangs trying to configure wake-on-LAN for the two Ethernet interfaces. Since u-boot doesn’t get far enough to boot Linux, my next task was stripping out all communication with the Weltrend from the u-boot source to see if I could at least get the NAS to boot Linux.

After building u-boot with WoL configuration disabled, I was able to kwboot u-boot and successfully boot into the Western Digital firmware.

In another stroke of luck, Western Digital has published a new firmware (2.30.181) to resolve a vulnerability discovered in their web management interface. Updating the Western Digital firmware on my EX2100 also updated the firmware on the Weltrend. The firmware update process resolved the issue with u-boot WoL and I had a fully functional unit again.


Obtaining the Weltrend firmware
I was mystified where the firmware from the Weltrend microcontroller came from. There is no file matching the contents of “uP.bin” or “uP_0.bin” in the filesystem of the firmware update, nor is there any firmware blob in the WD GPL archive that I could find.

After much searching in the squashfs filesystem of the update, and through the WD GPL archive, I finally gave up and grepped for a hex string in the firmware in the firmware update binary itself. At this point I was very surprised to find that the Weltrend firmware is simply appended to the end of the WD firmware update.

The firmware is under 50KB, as the size of the flash in the WT61P803 is only 49152 bytes. Chopping the last 50KB of the firmware update file with dd allows you to easily find the offset of the Weltrend firmware with hexdump and grep. The firmware starts with 02 5d a9 which is a long jump to address 0x5da9:


hexdump -C data.bin | grep 02 5d a9

With the offset from hexdump, you can again chop the file with dd to isolate only the Weltrend firmware. There doesn’t appear to be any data in the firmware update file after the Weltrend firmware, so there’s no need to remove any trailing data.


Firmware analysis

I was interested in reverse engineering the Weltrend firmware to determine what tasks it was performing. I know that the Weltrend is responsible for at least:

  1. System power to internal components (Armada CPU, system fan)
  2. Enabling or disabling SATA hard drive power
  3. Reading the ambient temperature sensor
  4. Controlling the system fan speed (PWM controlled)
  5. Power LED (colour, blink rate)

I asked a friend with IDA Pro to disassemble the binary to see if it was possible to isolate specific functions that would give insight into the tasks the Weltrend is performing. Unfortunately, IDA didn’t produce anything immediately obvious. But with some searching, we were able to identify some portions of the firmware, such as the UART command reply method:

While I dislike an opaque microcontroller being used for important system management functions, I’m not prepared to invest a lot of time in learning 8052 assembly so I can reverse engineer the firmware.


Conclusion

If you have a Western Digital NAS using a Weltrend microcontroller and it appears to be bricked, there is route to recovering the firmware and it’s not as impossible as it may seem at first glance. With access to the SDA/SCL header and an LPT adapter can be built from inexpensive components you can flash the Weltrend firmware extracted from the WD update file.

In the future I think it is best if I stick to the task at hand (writing Debian installation instructions) and refrain from messing with proprietary and undocumented microcontrollers responsible for key system functions like power management.

Stay tuned, installation instructions are coming soon!

Debian on WD EX2100

The Western Digital My Cloud EX2100 is a dual-bay NAS based on the Marvell Armada 385 dual core ARMv7 CPU first released in 2015.

In terms of NAS devices available in 2017, it isn’t very special. I would say the only major differences between most other devices in the 2 bay category are:

  • Dual Gigabit Ethernet
  • Screwless and trayless hard drive installation

The dual GigE interfaces are what attracted me to the device over competitors like the Zyxel NAS326 and Western Digital’s own MyCloud EX2 Ultra.

Unlike some other NAS bundles, it’s possible to buy the EX2100 without drives, so you can add your own preferred 3.5″ SATA hard drives. I bought a refurbished unit for 110€, which seems typical for a device with these features. For some reason the resale price of these units has skyrocketed since I bought mine in mid-2017. I personally would not pay more than 150€ for such a device. If you get into the higher price range of these SOHO devices, you’re almost always going to get better value for your money building your own NAS using standard x86 components (such as the HP MicroServer G7/Gen 8/Gen 10) and a distribution like FreeNAS or OpenMediaVault.

Since the vendor supplied firmware is almost always a pile of unsightly hacks, I set to work investigating into how to put a better operating system on the EX2100. If you stick around to the end, you’ll see this particular product also has its share of unfortunate hardware design decisions…

kwboot
Before we get into anything about u-boot or the operating system, we need to talk about kwboot.

kwboot stands for “Kirkwood boot”

Kirkwood is an ARMv5 SoC from Marvell around 2008-2009 that started out in the SheevaPlug (what single board computers were before the creation of the Raspberry Pi) and sooner or later found its way into a lot of NAS devices like the D-Link DNS320 and the Zyxel NSA320.

Coming back to the near-past (2015), and we have the Western Digital EX2100/4100 which use the Marvell Armada 385/388 CPU, which is a dual-core ARMv7 design. However it was known that the Armada SoC could boot from serial because of the SolidRun ClearFog. But the ClearFog uses DIP switches to set the boot source, and most (all?) consumer devices lack these.

ClearFog Pro boot source selection DIP switches

It turns out it is possible to kwboot consumer devices based on the Armada 38x, however you need to apply this patch to kwboot to parse the response from the Armada CPU, which differs from the Kirkwood response. Unfortunately the patch broke Kirkwood compatibility, and was seemingly never merged into u-boot mainline. However, you can still apply it to the kwboot source in u-boot and compile kwboot for use with Armada CPUs.

Once you have patched kwboot, you can use it to test new versions of u-boot via a USB to uart adapter:
$ ./kwboot -f -t -B 115200 /dev/ttyUSB0 -b u-boot-uart.bin -s 0 -q 1

There are some synchronization issues with the magic sequence, so it often takes several attempts before successfully loading via kwboot. A dead giveaway that you need to power cycle the device and try again is when you immediately see u-boot output in the console instead of “Sending boot image…”

A successful attempt should look similar to the following:
$ ./kwboot -f -t -B 115200 /dev/ttyUSB0 -b u-boot-a38x-Yosemite_2014T3_PQ-nand-uart.bin -s 0 -q 1
Sending boot message. Please reboot the target...-�$�"Ufw�$�"U����$
Dfw�$�"U�\�$�"U����$�DUf�$�"Uw��"U����$4"U���$�"Uw�$�"U���$�DUf|fD�&T���$�"U�E�$�"Df3DD�DU�E7$�"U����$4"U���$�"U�E�4"U�/7@� ��$DUw�$�"U����$�DUff�$�"D��fD$U��
Sending boot image...
0 % [......................................................................]

Once kwboot works, you can safely proceed to testing u-boot modifications without the risk that you brick your device, as kwboot runs code in memory without modifying the contents of NAND.

u-boot
Unfortunately mainline u-boot doesn’t support this device, although similar devices are supported, such as the Turris Omnia (Armada 385) and Solidrun Clearfog Pro (Armada 388). It’s no surprise that attempting to kwboot a build of mainline u-boot for these targets on the EX2100 doesn’t work. So currently we have no choice but to use the u-boot source from Western Digital’s GPL archive.

The stock u-boot on the device does not support saveenv. Without modifying NAND, it is possible to boot Linux from USB, however this requires using the uart console and manually entering the boot parameters on each boot.

Naively modifying the WD u-boot source to enable the saveenv command results in corruption of the kernel uImage since someone at WD set the environment offset to 5MB and this is beyond the u-boot partition, corrupting the uImage.

However it is possible to modify the WD u-boot source to save environment variables within the 5MB allocated for u-boot. This requires reflashing u-boot to the device. Before you replace the stock u-boot on your device, you should take a backup of the u-boot region of flash. This can be done from within the Western Digital firmware, but requires a USB to UART adapter and a header soldered to the PCB:
# nanddump --noecc --omitoob -f mtd0.bin /dev/mtd0

Remember to copy this file somewhere off-device, such as a USB key, for safe keeping!

The general steps to replace the stock u-boot are:

  1. kwboot a modified u-boot which saves environment variables within u-boot region
  2. Inside u-boot, run saveenv
  3. Boot Debian from USB or SATA
  4. Dump u-boot env to a file (using nandread)
  5. Erase u-boot portion of mtd0 (using flash_erase)
  6. Flash new u-boot (using nandwrite)
  7. Restore u-boot environment variables (using nandwrite)
  8. Reboot

Dump the u-boot env to a file:
# nanddump -s 0x100000 -l 0x80000 -f ubootenv.bin /dev/mtd0

Erase the u-boot portion of mtd0 and flash the new u-boot to NAND:
# flash_erase /dev/mtd0 0 8
# nandwrite -p /dev/mtd0 u-boot-a38x-Yosemite_2014T3_PQ-nand.bin

Restore u-boot environment variables:
# nandwrite -p /dev/mtd0 -s 0x100000 ubootenv.bin

Integrated MCU
Western Digital decided to use an external microcontroller to handle certain system management functions such as fan control, LED control, and power on/off.

Sadly the microcontroller uses a proprietary and undocumented protocol for communication, and as it turns out this protocol can differ even between Western Digital products!

For the Western Digital EX2100 and EX4100, the integrated microcontroller communicates on ttyS1 at 115200n8, unlike other Western Digital NAS products whose microcontroller communicates at 19200n8.

Thankfully, some of the commands are common, so once communication with the microcontroller has been established, fan control and temperature monitoring are functional. Fan control and temperature monitoring are available through a userspace daemon called “mcm-daemon” (MyCloud Mirror daemon). I have forked the mcm-daemon repository on GitHub and made modifications to support the EX2100/4100.

LED control and power on/off are still a work in progress as the reverse engineered commands used on other WD products do not work on the EX2100/4100.

Debian
The user bodhi at Doozan forums does a great job of providing pre-built Debian images for a variety of Marvell Armada based NAS devices.

Usually I would link to the excellent instructions bodhi normally writes for installing Debian, but since they don’t have the EX2100, writing the instructions fell to me.

But sadly I haven’t got installation instructions written because I’ve bricked my EX2100.

Weltrend WT61P8
Let’s revisit this mystery microcontroller in charge of so many tasks in the EX2100.

Well, after reading that Western Digital My Cloud products contained a backdoor and multiple vulnerabilities I thought I would go and update the WD firmware before continuing to write the Debian installation instructions. The WD firmware resides on the built in 512MB of EMMC, while Debian lives on a USB device, so the installation of Debian does not replace the original WD firmware.

During the WD update process I noticed that it was also updating the firmware of the Weltrend:

16479 root 6624 S /var/www/cgi-bin/system_mgr.cgi
16480 root 2560 S sh -c cd /usr/local/upload/;upload_firmware -a -n 'nas-new-firmware' >/dev/null;cd /
16481 root 4544 S upload_firmware -a -n nas-new-firmware
19436 root 49120 R mcu_upgrade -r -f /tmp/uP_0.bin
19552 root 2720 R ps ax

How curious! Since the Weltrend is very undocumented I was eager to learn more about the firmware it runs.

I found out a good deal more than I’d expected. Firstly, the mcu_upgrade binary contains some interesting strings. Here is a short sample of strings in the binary:

WT61P8
Enable ISP
Set ISP
Erase
Page Erase
Program
Set Address High Byte
Finish

The MCU firmware also has some very interesting strings. Here is a short sample of strings in the firmware:

nick 1111
nick 2222
nick 3333
nick 4444
MyCloudDL2000
Cannot Copy
from Camera
Cannot Move
Storage
Almost Full
Limit Reached
nick pwr on
nick pwr off 1
nick pwr off wol
Welcome to
RTC_ALARM pwr on

Googling the part number “WT61P8” lead to a very interesting datasheet (PDF) describing the microcontroller in detail.

What I found from the datasheet was… not anything I expected to find.

It’s a Turbo 8052 CPU with ~48KB of built-in EEPROM (this is my guess based on the part number and size of firmware mcu_upgrade was sending) and it’s a “Flat Panel Display Control Sub-MCU”

Most information about Weltrend microcontrollers is on Russian language forums dedicated to TV repair. The most common use of this MCU is in Samsung TVs for power management, since it includes an IR receiver and HDMI CEC capabilities.

They do support ISP (In-system Programming) via I2C, if you have the right hardware. There are quite a few Russian articles and YouTube videos on how to program these chips in TVs.

Conclusion

After reading about WD’s numerous firmware vulnerabilities and a back door, which were also present in D-Link NAS products (implying a shared code base or same third party contractor), and then learning that the microcontroller in charge of power management for the EX2100 (and other My Cloud products) was intended for power management in LCD TVs:

My final $0.02: this thing is an utter bodge job in both hardware and software! Don’t buy one of these. It doesn’t matter that can be persuaded to run Debian, it’s terrible value for the price.

You’re far better off getting an older PC and running FreeNAS or OpenMediaVault. Older corporate tower PCs with 2nd or 3rd gen Intel processors like the Dell Optiplex line can easily be purchased for under $150 from places like eBay.

If power consumption is really important to you, then I would recommend something like the Rock64 which has Gigabit Ethernet and excellent USB 3.0 performance with Armbian. It also comes with more RAM than the EX2100 (1/2/4GB while EX2100 has only 1GB) and is a quad core aarch64 instead of dual core armv7!

Best of all, an older PC or Pine64 is going to be cheaper than the EX2100 (or ludicrously more expensive 4 bay EX4100) anyway.

If I ever manage to restore the Weltrend firmware rest assured there will be a follow up article with both the journey of unbricking and instructions to install Debian. Until then, I’m going to take the HDDs I planned to use in the EX2100 and build a FreeNAS in an old PC. ✌️