Category Archives: Linux

Building Linux 4.1 for the Banana Pi

This post is a follow up to my original post Building BananaPi LeMaker Kernel.

If you’re just looking for a vanilla Debian or Ubuntu image for your Banana Pi that utilizes a Linux kernel newer than 3.4.xxx, then stop reading and go to this page maintained by Igor Pečovnik. He provides pre-built Debian and Ubuntu images for a variety of Banana Pi boards.

If you want to manually build an image, he has put the build scripts he uses up on his GitHub repository. While I tried to do everything manually starting from my last post, I ended up building a kernel that would not boot. So I shamelessly stole the kernel configuration from Igor, and the resulting kernel boots.

The GMAC driver which required so much patching for the 3.4 kernel was mainlined in 3.17. As such, these instructions should work for any kernel newer than 3.17. I am building 4.1.3 in my script.

Here is the Jenkins/bash script to build the kernel, modules, and boot goodness you need (a direct link to the .sh file is at the end of the post):

if [ ! -d "linux-4.1.3" ]; then
wget https://www.kernel.org/pub/linux/kernel/v4.x/linux-4.1.3.tar.xz
tar -Jxvf linux-4.1.3.tar.xz
fi
cd linux-4.1.3
wget https://watchmysys.com/blog/wp-content/uploads/2015/07/banana-pi-linux-4.1.3-config.txt -O .config
make ARCH=arm CROSS_COMPILE=arm-linux-gnueabihf- clean
make -j4 ARCH=arm CROSS_COMPILE=arm-linux-gnueabihf- LOADADDR=0x40008000 zImage dtbs
make ARCH=arm CROSS_COMPILE=arm-linux-gnueabihf- INSTALL_MOD_PATH=output modules
make ARCH=arm CROSS_COMPILE=arm-linux-gnueabihf- INSTALL_MOD_PATH=output modules_install
mkdir -p output/boot/
cp arch/arm/boot/zImage output/boot/
cp arch/arm/boot/dts/sun7i-a20-bananapi.dtb output/boot/
cat > output/boot/boot.cmd < output/boot/uEnv.txt << EOF
fatload mmc 0 0x46000000 zImage
fatload mmc 0 0x49000000 sun7i-a20-bananapi.dtb
setenv bootargs console=ttyS0,115200 [earlyprintk] root=/dev/mmcblk0p2 rootwait panic=10 rootfstype=ext4 rw ${extra}
bootz 0x46000000 - 0x49000000
EOF
mkimage -C none -A arm -T script -d output/boot/boot.cmd output/boot/boot.scr
cd ..
if [ ! -d "u-boot-2015.04" ]; then
wget ftp://ftp.denx.de/pub/u-boot/u-boot-2015.04.tar.bz2
tar -jxvf u-boot-2015.04.tar.bz2
fi
cd u-boot-2015.04
make -s CROSS_COMPILE=arm-linux-gnueabihf- clean
make ARCH=arm CROSS_COMPILE=arm-linux-gnueabihf- Bananapi_defconfig
make -j4 ARCH=arm CROSS_COMPILE=arm-linux-gnueabihf-
cp u-boot-sunxi-with-spl.bin ../linux-4.1.3/output/boot/
cd ../linux-4.1.3/
cat > output/boot/uEnv.txt << EOF
fatload mmc 0 0x46000000 zImage
fatload mmc 0 0x49000000 sun7i-a20-bananapi.dtb
setenv bootargs console=ttyS0,115200 [earlyprintk] root=/dev/mmcblk0p2 rootwait panic=10 rootfstype=ext4 rw ${extra}
bootz 0x46000000 - 0x49000000
EOF
tar -C output -cjvf ../linux-bananapi-4.1.3.tar.bz2 boot/ lib/

Here is what the partition layout of my SDHC card:

root@bpi:~# fdisk -l /dev/mmcblk0

Disk /dev/mmcblk0: 7948 MB, 7948206080 bytes
4 heads, 16 sectors/track, 242560 cylinders, total 15523840 sectors
Units = sectors of 1 * 512 = 512 bytes
Sector size (logical/physical): 512 bytes / 512 bytes
I/O size (minimum/optimal): 512 bytes / 512 bytes
Disk identifier: 0x00000000

        Device Boot      Start         End      Blocks   Id  System
/dev/mmcblk0p1   *        2048      133119       65536    c  W95 FAT32 (LBA)
/dev/mmcblk0p2          133120    15523839     7695360   83  Linux

Here is the contents of the boot partition (mmcblk0p1, vfat):

root@bpi:~# ls /boot
boot.cmd  boot.scr  sun7i-a20-bananapi.dtb  uEnv.txt  zImage

boot.cmd

fatload mmc 0 0x46000000 zImage
fatload mmc 0 0x49000000 sun7i-a20-bananapi.dtb
setenv bootargs console=ttyS0,115200 earlyprintk root=/dev/mmcblk0p2 rw rootwait panic=10 
bootm 0x46000000 - 0x49000000

uEnv.txt

fatload mmc 0 0x46000000 zImage
fatload mmc 0 0x49000000 sun7i-a20-bananapi.dtb
setenv bootargs console=ttyS0,115200 [earlyprintk] root=/dev/mmcblk0p2 rootwait panic=10 rootfstype=ext4 rw ${extra}
bootz 0x46000000 - 0x49000000

You will need to update u-boot on the SD card to v2015.04. If you use the script I provide above, this file is in boot/u-boot-sunxi-with-spl.bin. You need to write it to the SD card using dd:

dd if=boot/u-boot-sunxi-with-spl.bin of=/dev/mmcblk0 bs=1024 seek=8

More notes:
I was unable to build this kernel running Debian 7 (Wheezy) because binutils is too old. Unfortunately the official repositories do not have a newer version available for Wheezy (slash) I was too lazy to look for a repository that might have a newer version. As such, I upgraded by Jenkins build box to Debian 8 (Jessie) to build this kernel.

Additionally, I had to upgrade from a 1GB SD Card in my Banana Pi to an 8GB SDHC Card because the new u-boot does not seem to like small (non-SDHC) cards.

Banana Pi info:

root@bpi:~# free -m
             total       used       free     shared    buffers     cached
Mem:           996         72        923          0          4         19
-/+ buffers/cache:         48        948
Swap:            0          0          0
root@bpi:~# uname -a
Linux bpi 4.1.3-bananapi #2 SMP Sun Jul 26 15:41:54 CEST 2015 armv7l GNU/Linux
root@bpi:~# lsmod
Module                  Size  Used by
root@bpi:~#

Speed test of the network interface:

# Laptop with Gigabit wired connection, saving to /tmp/ ramdisk
[derp@laptop ~]$ nc -lp 5000 | dd of=/tmp/zerofile
# Banana Pi
root@bpi:~# dd if=/dev/zero bs=1M count=2000 | nc laptop 5000
2000+0 records in
2000+0 records out
2097152000 bytes (2.1 GB) copied, 73.5536 s, 28.5 MB/s

Yes, it is a Gigabit link, but not the fastest. It does seem to be quite stable, and since I am not using my Banana Pi for a bandwidth intensive purpose, this speed is fine for me.

The build script does everything with relative paths, and can be run as a normal user. The output is a tar.bz2 archive containing u-boot binary, boot folder, and kernel modules. You will need sudo/root to install the u-boot bin file with dd as described above.

Download kernel .config: here
Download build script: here
Download u-boot 2015.04: here (SHA1SUM: 8bf4f738ba8aa18ab5d45fca324587f0749f7c10)
Download tar archive with u-boot, kernel, and modules: here (SHA1SUM: d94a8da66ce6d77a1ceb4569740cadf2c8c67e72)
Installing CentOS 7 with a chroot

I needed to install CentOS 7 on an embedded PC with UEFI and 2 SSD disks in mdadm RAID1.

While I’m sure the guys at Red Hat work very hard on CentOS, the installer is a piece of cr*p, especially when it comes to disk partitioning. I have never hated any installer more than the CentOS disk partitioner. I don’t know what happened. The disk partitioning tool in CentOS 6 installer was fine, I had no problems using it, but in the 7 installer it’s just a nightmare to do anything. In my opinion Windows installer does a better job of disk partitioning than the CentOS 7 installer.

While many people who like CentOS will proclaim that the error is between the keyboard and chair, I welcome them to provide a write-up and screenshots of how to accomplish my desired partitioning scheme using the graphical installer. If the instructions are shorter than this blog post, next time I won’t use a chroot to install.

I loosely based my method off of this post, but immediately found I had to deviate because I didn’t have USB install media with all the required commands on it.

Required tools:
1) USB stick with some Linux distro on it (I prefer the Gentoo minimal installer, it’s small and it includes lots of useful utilities)
2) USB stick with the CentOS minimal installer on it
3) About 2GB of free space, you can use a ramdisk, or create an extra partition using the free space on the USB sticks (CentOS occupies about 800MB, Gentoo about 300MB)

Steps:
1) Boot the Gentoo installer off the USB stick
2) Partition your disks however you like using gdisk, fdisk, or parted
3) Create your mdadm array(s)
4) Plug in the CentOS 7 USB stick and mount it to a temporary mount point (e.g. /tmp/centos)

Inside the CentOS USB stick you will find LiveOS/squashfs.img, you need to loopback mount this:

livecd ~ # mount -o loop /tmp/cinstall/LiveOS/squashfs.img /tmp/csquashfs/

Now we have yet another image to mount, this one within the squashfs image:

livecd ~ # mount -o loop /tmp/csquashfs/LiveOS/rootfs.img /tmp/croot

Finally we have a Linux filesystem. But unfortunately we cannot use it for anything as it is mounted read-only and there is no resolv.conf present, so no domain names can be resolved. This is why you need ~2GB of free space somewhere (or 4GB of RAM).

livecd ~ # mkfs -q /dev/ram1 1572864
livecd ~ # mkdir -p /tmp/ramdisk
livecd ~ # mount /dev/ram1 /tmp/ramdisk
livecd ~ # rsync -avHp /tmp/croot /tmp/ramdisk

Now that we have the installer rootfs somewhere writable, copy /etc/resolv.conf to the filesystem:

livecd ~ # cp /etc/resolv.conf /tmp/ramdisk/etc/resolv.conf

Mount your destination partition for CentOS somewhere you can access from within the chroot:

livecd ~ # mount /dev/vg0/centos /tmp/ramdisk/mnt

Chroot to the installer environment:

livecd ~ # chroot /tmp/ramdisk

Download the CentOS release RPM and install it to the destination partition:

bash-4.2# wget http://mirror.centos.org/centos/7/os/x86_64/Packages/centos-release-7-0.1406.el7.centos.2.3.x86_64.rpm
bash-4.2# rpm --root=/mnt --nodeps -i centos-release-7-0.1406.el7.centos.2.3.x86_64.rpm

Because yum is missing the yummain module in the installation environment, we need to download and install the yum RPM on the installer partition:

bash-4.2# wget http://mirror.centos.org/centos/7/os/x86_64/Packages/yum-3.4.3-118.el7.centos.noarch.rpm
bash-4.2# rpm -i --nodeps yum-3.4.3-118.el7.centos.noarch.rpm

Now finally we can run yum on the destination partition to install CentOS:

bash-4.2# yum --installroot=/mnt update
bash-4.2# yum --installroot=/mnt install -y yum
bash-4.2# yum --installroot=/mnt install -y @core kernel
bash-4.2# yum --installroot=/mnt install -y grub2-efi efibootmgr lvm2 mdadm \
dosfstools kernel

Now unfortunately I hit a small snag: the Gentoo installer isn’t EFI aware. Exit the chroot, but remember to copy /etc/resolv.conf to the destination partition:

livecd ~ # cp /etc/resolv.conf /tmp/ramdisk/mnt/etc/

Poweroff and unplug the Gentoo installer USB stick. Plug in the CentOS installer stick and boot to the rescue environment. Skip rootfs detection.

Mount the partition/LV slice containing your CentOS installation:

sh-4.2# mkdir /mnt/centos
sh-4.2# mount /dev/vg0/centos /mnt/centos
sh-4.2# mount -t proc proc /mnt/centos/proc
sh-4.2# mount --rbind /dev /mnt/centos/dev
sh-4.2# mount --rbind /sys /mnt/centos/sys
sh-4.2# chroot /mnt/centos /bin/bash

Save the mdadm array information to the mdadm.conf configuration file:

bash-4.2# mdadm --detail --scan > /etc/mdadm.conf

Format your EFI boot partition:

bash-4.2# mkfs.vfat /dev/sda1
bash-4.2# mkdir /boot/efi
bash-4.2# mount /dev/sda1 /boot/efi

Install grub:

bash-4.2# grub2-install
Installing for x86_64-efi platform
...
Installation finished. No error reported.

Now, dear reader, this is the part where you do not see the hours I spent debugging why dracut would not find my root partition (hint: see Fedora wiki for dracut debugging steps). The tl;dr is that the mdadm array wasn’t being assembled, for reasons still unknown. To solve this we need to add our array UUID as an additional kernel parameter for grub:

bash-4.2# MD_UUID=$(mdadm -D /dev/md0 | grep UUID | awk '{print $3}')
bash-4.2# grubby --update-kernel=/boot/vmlinuz-3.10.0-123.20.1.el7.x86_64 \
--args="rd_MD_UUID=$MD_UUID"
bash-4.2# grub2-mkconfig -o /boot/grub2/grub.cfg

Absolutely verify in /boot/grub2/grub.cfg that the correct rd_MD_UUID was appended to linuxefi, or like me, you may be left wondering why your system won’t boot.

Check with efibootmgr that a menu entry was created:

bash-4.2# efibootmgr -v
...
Boot0014* grub  HD(1,800,32000,SUPER-LONG-UUID)File(\EFI\grub\grubx64.efi)

Don’t forget to set a root password:

bash-4.2# passwd
Changing password for user root.
New password:
Retype new password:
passwd: all authentication tokens updated successfully

Configuring the hostname (using hostnamectl, or editing /etc/sysconfig/network and /etc/hostname), udev rules for eth* interface names, and static network configuration in /etc/sysconfig/network-scripts/ifcfg-eth* is left as an exercise for the reader.

After rebooting

If when you reboot you find that you cannot login as root using the password you specified, it’s probably SELinux. Normally I hate disabling SELinux, but in this case I was so tired of spending a day and a half debugging booting issues, I just disabled it and went on with the setup.

Despite what the wonderful CentOS installer tells you, you do not require a separate /boot partition. Right now this is what the partition layout looks like:

Disk /dev/sda: 128.0 GB, 128035676160 bytes, 250069680 sectors
Units = sectors of 1 * 512 = 512 bytes
Sector size (logical/physical): 512 bytes / 4096 bytes
I/O size (minimum/optimal): 4096 bytes / 4096 bytes
Disk label type: gpt


#         Start          End    Size  Type            Name
 1         2048       206847    100M  EFI System      EFI System
 2       206848    250069646  119.1G  Linux RAID      Linux RAID

Because the contents of /boot/efi is static, and cannot be mdraid, remember to copy the contents of /dev/sda1 to /dev/sdb1 so that if your first drive ever dies, you will still have the required EFI components to boot off the second drive.

Overall, I can’t say this was a lot of fun. But I did learn a lot more about dracut and the CentOS booting process, and I can still say with confidence that I hate the CentOS 7 installer.

libvirtd user authentication using SASL/Kerberos

We’ve looked at how to setup libvirt for encrypted remote access using a SASL file database to authenticate users.

But, wouldn’t it be nice if we could integrate libvirt users into LDAP, like we did previously with Jenkins and Mediawiki? Doing so would give you the SSO benefits of Kerberos, and the security and policy features of FreeIPA.

To get started, we need to install some packages on the libvirtd server and the client where you’ll be running virsh or virt-manager.

Debian:

$ sudo apt-get install libsasl2-2 libsasl2-modules-gssapi-mit

CentOS/RedHat:

$ sudo yum install cyrus-sasl cyrus-sasl-gssapi

Arch Linux:

$ sudo pacman -S libsasl cyrus-sasl cyrus-sasl-gssapi

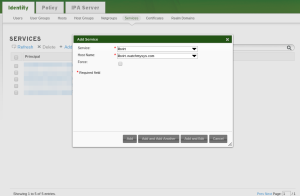
Next we need to create a service principal in LDAP for libvirt, and export it to a keytab which we’ll install on the libvirtd server. In the FreeIPA admin, navigate to: Identity -> Services -> Add

libvirt_service_princ

The service is “libvirt” and the Host Name is the server running libvirtd. In this example the principal would be “libvirt/[email protected]

You can verify this by running ipa service-show on the IPA server:

$ ipa service-show libvirt/libvirt.watchmysys.com
  Principal: libvirt/[email protected]
  Keytab: True
  Managed by: libvirt.watchmysys.com

Once you’ve created the principal it needs to be exported to a keytab which will be installed on the libvirtd server:

ipa cert-request --principal=libvirt/libvirt.watchmysys.com libvirt.keytab

The libvirt.keytab file needs to be copied to /etc/libvirt/krb5.keytab the libvirtd server with permissions 0600.

Now we need to change SASL to authenticate using Kerberos, instead of the file based authentication we had before.

$ sudo vi /etc/sasl2/libvirt.conf
mech_list: gssapi
keytab: /etc/libvirt/krb5.keytab

Ensure that there are no other mechanisms defined in mech_list and that sasldb_path: is commented out.

Now if you have a valid ticket on your client you should be able to login using virsh or virt-manager without having to type in a username or password.

Before logging in to libvirtd:

client $ klist
Ticket cache: FILE:/tmp/krb5cc_1000
Default principal: [email protected]

Valid starting       Expires              Service principal
10/27/2014 20:06:48  10/28/2014 20:06:45  krbtgt/[email protected]

Open virt-manager or use virsh to connect to the hypervisor:

client $ virsh -c qemu+tls://libvirt.watchmysys.com/system list
 Id    Name                           State
----------------------------------------------------
 1     debian7                          running
 2     centos7                          running
 3     arch2014.08                      running
 4     opensuse                         running
 5     xbuntu1404                       running
 6     windows7                         running

After logging in to libvirtd:

client $ klist
Ticket cache: FILE:/tmp/krb5cc_1000
Default principal: [email protected]

Valid starting       Expires              Service principal
10/27/2014 20:06:48  10/28/2014 20:06:45  krbtgt/[email protected]
10/27/2014 20:06:53  10/28/2014 20:06:45  libvirt/[email protected]

Nice.

Troubleshooting

Failed to start SASL negotiation: -4 (SASL(-4): no mechanism available: No worthy mechs found)

Check that you have the proper sasl gssapi packages installed on both the client and the server.