What do you do with a device you never would have bought for yourself, but received for free? Say welcome the D-Link DAP-1520, a “WiFi Extender” that was given to me by O2 as a bonus for signing up with them. Hopefully they aren’t expecting it back in one piece…
So, what is the DAP-1520? Executive summary:
Right, now that we’ve got the useless D-Link page out of the way, let’s talk about what’s actually in the DAP-1520:
This all sounds great, but what do we actually have here? I will preface this post by saying that I started out wanting to port OpenWrt to this device, and I still do, but I got side tracked in my investigation and you’ll have to wait for a follow up post if I ever succeed to port OpenWrt.

PCB front
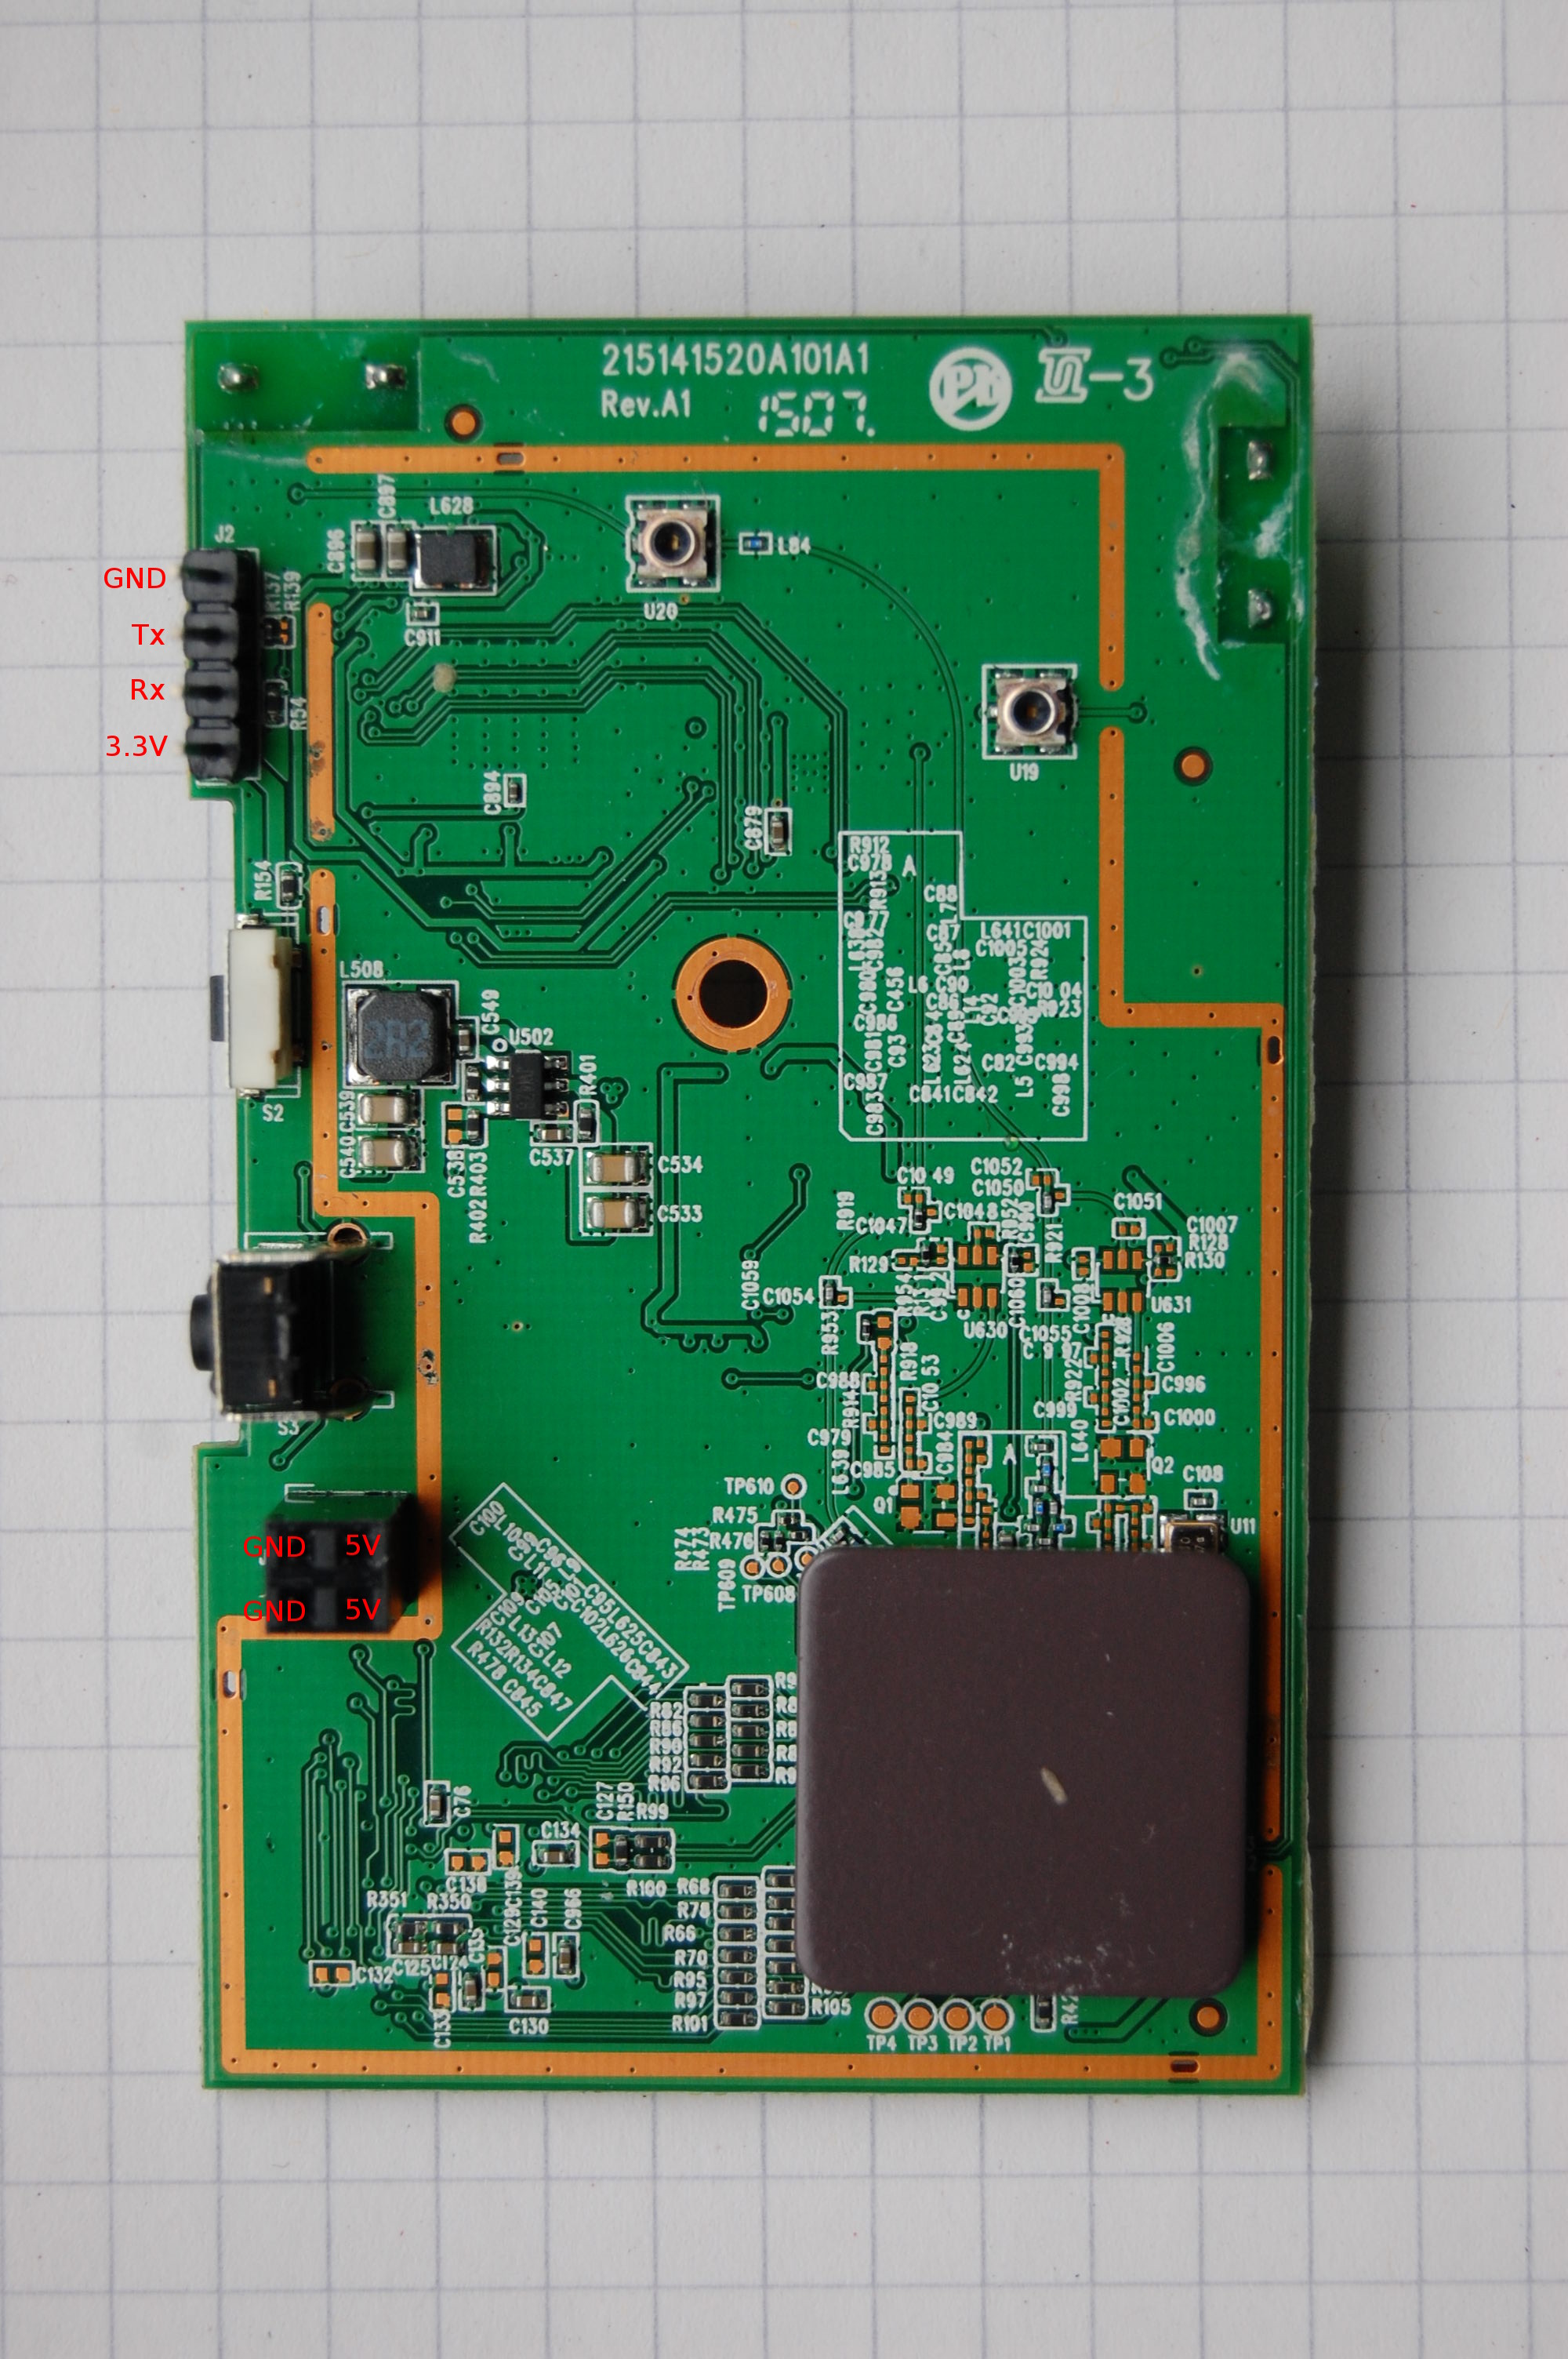
PCB Rear
The UART runs at 57600 8N1.
No pictures of the power supply because it’s just a boring 5V power source.
Okay, so now that we know the UART pinout, what does the device say when it boots?
Boot log:
U-Boot 1.1.3 (Aug  8 2013 - 10:32:46)

Board: Ralink APSoC DRAM:  64 MB
relocate_code Pointer at: 83fb0000
enable ephy clock...done. rf reg 29 = 5
SSC disabled.
spi_wait_nsec: 29
spi device id: c2 20 17 c2 20 (2017c220)
find flash: MX25L6405D
raspi_read: from:30000 len:1000
*** Warning - bad CRC, using default environment

============================================
Ralink UBoot Version: 4.1.1.0
--------------------------------------------
ASIC 7620_MP (Port5None)
DRAM component: 512 Mbits DDR, width 16
DRAM bus: 16 bit
Total memory: 64 MBytes
Flash component: SPI Flash
Date:Aug  8 2013  Time:10:32:46
Cameo Version: v1.00 Build:01
Module Name: D-Link DAP-1520A1
============================================
icache: sets:512, ways:4, linesz:32 ,total:65536
dcache: sets:256, ways:4, linesz:32 ,total:32768

 ##### The CPU freq = 580 MHZ ####
 estimate memory size =64 Mbytes
raspi_read: from:50000 len:40
raspi_read: from:4f0000 len:40

=================================================
Check image validation:
Image1 Header Magic Number --> OK
Image2 Header Magic Number --> OK
Image1 Header Checksum --> OK
Image2 Header Checksum --> OK
Image1 Data Checksum --> raspi_read: from:50040 len:ddf98
OK
Image2 Data Checksum --> raspi_read: from:4f0040 len:ca8f4
OK
Image1 Stable Flag --> Not stable
Image1 Try Counter --> 0

Image1: OK Image2: OK
Both images are OK!!!

=================================================

Please choose the operation:
   1: Load system code to SDRAM via TFTP.
   2: Load system code then write to Flash via TFTP.
   3: Boot system code via Flash (default).
   4: Entr boot command line interface.
   7: Load Boot Loader code then write to Flash via Serial.
   9: Load Boot Loader code then write to Flash via TFTP.
 1  0

3: System Boot system code via Flash.
## Booting image at bc050000 ...
raspi_read: from:50000 len:40
   Image Name:   Linux Kernel Image
   Image Type:   MIPS Linux Kernel Image (lzma compressed)
   Data Size:    909208 Bytes = 887.9 kB
   Load Address: 80000000
   Entry Point:  8000c310
raspi_read: from:50040 len:ddf98
   Verifying Checksum ... OK
   Uncompressing Kernel Image ... OK
No initrd
## Transferring control to Linux (at address 8000c310) ...
## Giving linux memsize in MB, 64

Starting kernel ...


LINUX started...

 THIS IS ASIC
Linux version 2.6.36.x (root@ubuntu-10) (gcc version 3.4.2) #1 Fri Aug 22 16:26:27 CST 2014

 The CPU feqenuce set to 580 MHz

 MIPS CPU sleep mode enabled.
 PCIE: bypass PCIe DLL.
 PCIE: Elastic buffer control: Addr:0x68 -> 0xB4
 disable all power about PCIe
CPU revision is: 00019650 (MIPS 24Kc)
Determined physical RAM map:
 memory: 04000000 @ 00000000 (usable)
Zone PFN ranges:
  Normal   0x00000000 -> 0x00004000
Movable zone start PFN for each node
early_node_map[1] active PFN ranges
    0: 0x00000000 -> 0x00004000
Built 1 zonelists in Zone order, mobility grouping on.  Total pages: 16256
Kernel command line: console=ttyS1,57600n8 root=/dev/mtdblock5 console=ttyS0,57600 root=31:05 rootfstype=squashfs init=/sbin/init
PID hash table entries: 256 (order: -2, 1024 bytes)
Dentry cache hash table entries: 8192 (order: 3, 32768 bytes)
Inode-cache hash table entries: 4096 (order: 2, 16384 bytes)
Primary instruction cache 64kB, VIPT, 4-way, linesize 32 bytes.
Primary data cache 32kB, 4-way, PIPT, no aliases, linesize 32 bytes
Writing ErrCtl register=0007efde
Readback ErrCtl register=0007efde
Memory: 62028k/65536k available (2225k kernel code, 3508k reserved, 338k data, 168k init, 0k highmem)
NR_IRQS:128
MTK/Ralink System Tick Counter init... cd:80271d98, m:214748, s:32
console [ttyS1] enabled
Calibrating delay loop... 386.04 BogoMIPS (lpj=772096)
pid_max: default: 32768 minimum: 301
Mount-cache hash table entries: 512
NET: Registered protocol family 16
RALINK_GPIOMODE = 1a311d
RALINK_GPIOMODE = 18311d
PPLL_CFG1=0xe90000
MT7620 PPLL lock
PPLL_DRV =0x80080504
start PCIe register access
RALINK_PCI_PCICFG_ADDR = 1000f0

*************** MT7620 PCIe RC mode *************
bio: create slab  at 0
vgaarb: loaded
pci 0000:00:00.0: BAR 8: assigned [mem 0x20000000-0x201fffff]
pci 0000:00:00.0: BAR 1: assigned [mem 0x20200000-0x2020ffff]
pci 0000:00:00.0: BAR 1: set to [mem 0x20200000-0x2020ffff] (PCI address [0x20200000-0x2020ffff]
pci 0000:01:00.0: BAR 0: assigned [mem 0x20000000-0x200fffff]
pci 0000:01:00.0: BAR 0: set to [mem 0x20000000-0x200fffff] (PCI address [0x20000000-0x200fffff]
pci 0000:01:00.1: BAR 0: assigned [mem 0x20100000-0x201fffff]
pci 0000:01:00.1: BAR 0: set to [mem 0x20100000-0x201fffff] (PCI address [0x20100000-0x201fffff]
pci 0000:00:00.0: PCI bridge to [bus 01-01]
pci 0000:00:00.0:   bridge window [io  disabled]
pci 0000:00:00.0:   bridge window [mem 0x20000000-0x201fffff]
pci 0000:00:00.0:   bridge window [mem pref disabled]
BAR0 at slot 0 = 0
bus=0x0, slot = 0x0
res[0]->start = 0
res[0]->end = 0
res[1]->start = 20200000
res[1]->end = 2020ffff
res[2]->start = 0
res[2]->end = 0
res[3]->start = 0
res[3]->end = 0
res[4]->start = 0
res[4]->end = 0
res[5]->start = 0
res[5]->end = 0
bus=0x1, slot = 0x0
res[0]->start = 20000000
res[0]->end = 200fffff
res[1]->start = 0
res[1]->end = 0
res[2]->start = 0
res[2]->end = 0
res[3]->start = 0
res[3]->end = 0
res[4]->start = 0
res[4]->end = 0
res[5]->start = 0
res[5]->end = 0
bus=0x1, slot = 0x0
res[0]->start = 20100000
res[0]->end = 201fffff
res[1]->start = 0
res[1]->end = 0
res[2]->start = 0
res[2]->end = 0
res[3]->start = 0
res[3]->end = 0
res[4]->start = 0
res[4]->end = 0
res[5]->start = 0
res[5]->end = 0
Switching to clocksource Ralink external timer
NET: Registered protocol family 2
IP route cache hash table entries: 1024 (order: 0, 4096 bytes)
TCP established hash table entries: 2048 (order: 2, 16384 bytes)
TCP bind hash table entries: 2048 (order: 1, 8192 bytes)
TCP: Hash tables configured (established 2048 bind 2048)
TCP reno registered
UDP hash table entries: 256 (order: 0, 4096 bytes)
UDP-Lite hash table entries: 256 (order: 0, 4096 bytes)
NET: Registered protocol family 1
squashfs: version 4.0 (2009/01/31) Phillip Lougher
msgmni has been set to 121
Block layer SCSI generic (bsg) driver version 0.4 loaded (major 254)
io scheduler noop registered (default)
Ralink gpio driver initialized
Serial: 8250/16550 driver, 2 ports, IRQ sharing disabled
serial8250: ttyS0 at MMIO 0x10000500 (irq = 37) is a 16550A
serial8250: ttyS1 at MMIO 0x10000c00 (irq = 12) is a 16550A
brd: module loaded
deice id : c2 20 17 c2 20 (2017c220)
MX25L6405D(c2 2017c220) (8192 Kbytes)
mtd .name = raspi, .size = 0x00800000 (0M) .erasesize = 0x00000008 (0K) .numeraseregions = 65536
Creating 9 MTD partitions on "raspi":
0x000000000000-0x000000800000 : "ALL"
0x000000000000-0x000000030000 : "u-boot"
0x000000030000-0x000000040000 : "nvram"
0x000000040000-0x000000050000 : "Factory"
0x000000050000-0x000000140000 : "linux4"
0x000000140000-0x0000004e0000 : "rootfs"
0x0000004e0000-0x0000004f0000 : "LANG"
0x0000004f0000-0x0000005c0000 : "linux4b"
0x0000005c0000-0x000000800000 : "rootfsb"
rdm_major = 253
SMACCR1 -- : 0x0000000c
SMACCR0 -- : 0x43762077
Ralink APSoC Ethernet Driver Initilization. v3.0  256 rx/tx descriptors allocated, mtu = 1500!
SMACCR1 -- : 0x0000000c
SMACCR0 -- : 0x43762077
PROC INIT OK!
TCP cubic registered
NET: Registered protocol family 10
IPv6 over IPv4 tunneling driver
NET: Registered protocol family 17
VFS: Mounted root (squashfs filesystem) readonly on device 31:5.
Freeing unused kernel memory: 168k freed
init started:  BusyBox v1.01 (2014.08.22-08:26+0000) multi-call binary
Algorithmics/MIPS FPU Emulator v1.5
devpts: called with bogus options
init NVRAM_SPACE from mtdblock size
init nvram memory map size: 0x10000 order of pages: 0x4
nvram module init:
    /dev/nvram major number 225 glues to mtd: "nvram" size: 0x00010000
    nvram_space: 0x00010000 mapped via mmap(2)
openfile :/etc/sysinfo
openfile :/etc/nvram.default


BusyBox v1.01 (2014.08.22-08:26+0000) Built-in shell (ash)
Enter 'help' for a list of built-in commands.

/ # rm: cannot remove `/var/wizard_lang.js': No such file or directory
umount: cannot umount /tmp/lang_pack: No such file or directory
eth2: Cannot assign requested address
Raeth v3.0 (Tasklet,SkbRecycle)

phy_tx_ring = 0x03f4b000, tx_ring = 0xa3f4b000

phy_rx_ring0 = 0x03f4c000, rx_ring0 = 0xa3f4c000
SMACCR1 -- : 0x000054b8
SMACCR0 -- : 0x0a7d19a6
CDMA_CSG_CFG = 81000000
GDMA1_FWD_CFG = 20710000
umount: cannot umount /tmp/lang_pack: No such file or directory
mount: mounting /dev/mtdblock6 on /tmp/lang_pack failed
eth2: Cannot assign requested address
device eth2 entered promiscuous mode
TFTP main
standard_tftp_server launched on port 69.
killall: syslogd: no process killed
killall: klogd: no process killed
Sat Jan  1 00:00:00 UTC 2011
/tmp/password has been created
br0: port 1(eth2) entering forwarding state
br0: port 1(eth2) entering forwarding state
Set: phy[0].reg[0] = 3900
Set: phy[1].reg[0] = 3900
Set: phy[2].reg[0] = 3900
Set: phy[3].reg[0] = 3900
Set: phy[4].reg[0] = 3900
Set: phy[0].reg[0] = 3100
2011-01-01 00:00:00: (network.c.247) warning: please use server.use-ipv6 only for hostnames, not without server.bind / empty address; your config will break if the kernel default for IPV6_V6ONLY changes
rt2860v2_ap: module license 'unspecified' taints kernel.
Disabling lock debugging due to kernel taint


=== pAd = c04cd000, size = 1278080 ===

<-- RTMPAllocTxRxRingMemory, Status=0
<-- RTMPAllocAdapterBlock, Status=0
AP Driver version-2.7.1.6_edcca_monitor_20131222


=== pAd = c0b02000, size = 2010752 ===

<-- RTMPAllocTxRxRingMemory, Status=0
MT76x0_WLAN_ChipOnOff(): OnOff:1, pAd->WlanFunCtrl:0x0, Reg-WlanFunCtrl=0xff000002
MACVersion = 0x76502000
RX DESC a3672000  size = 2048
RTMP_TimerListAdd: add timer obj c05a1e20!
RTMP_TimerListAdd: add timer obj c053b694!
RTMP_TimerListAdd: add timer obj c053f78c!
RTMP_TimerListAdd: add timer obj c053f84c!
RTMP_TimerListAdd: add timer obj c053f90c!
RTMP_TimerListAdd: add timer obj c053f9cc!
RTMP_TimerListAdd: add timer obj c053fa8c!
RTMP_TimerListAdd: add timer obj c053fb4c!
RTMP_TimerListAdd: add timer obj c053fc0c!
RTMP_TimerListAdd: add timer obj c053fccc!
RTMP_TimerListAdd: add timer obj c053fd8c!
RTMP_TimerListAdd: add timer obj c053fe4c!
RTMP_TimerListAdd: add timer obj c053ff0c!
RTMP_TimerListAdd: add timer obj c053ffcc!
RTMP_TimerListAdd: add timer obj c054008c!
RTMP_TimerListAdd: add timer obj c054014c!
RTMP_TimerListAdd: add timer obj c054020c!
RTMP_TimerListAdd: add timer obj c05402cc!
RTMP_TimerListAdd: add timer obj c0569e9c!
RTMP_TimerListAdd: add timer obj c056df94!
RTMP_TimerListAdd: add timer obj c056e054!
RTMP_TimerListAdd: add timer obj c056e114!
RTMP_TimerListAdd: add timer obj c056e1d4!
RTMP_TimerListAdd: add timer obj c056e294!
RTMP_TimerListAdd: add timer obj c056e354!
RTMP_TimerListAdd: add timer obj c056e414!
RTMP_TimerListAdd: add timer obj c056e4d4!
RTMP_TimerListAdd: add timer obj c056e594!
RTMP_TimerListAdd: add timer obj c056e654!
RTMP_TimerListAdd: add timer obj c056e714!
RTMP_TimerListAdd: add timer obj c056e7d4!
RTMP_TimerListAdd: add timer obj c056e894!
RTMP_TimerListAdd: add timer obj c056e954!
RTMP_TimerListAdd: add timer obj c056ea14!
RTMP_TimerListAdd: add timer obj c056ead4!
RTMP_TimerListAdd: add timer obj c053b668!
RTMP_TimerListAdd: add timer obj c053b6c0!
RTMP_TimerListAdd: add timer obj c053f760!
RTMP_TimerListAdd: add timer obj c053f820!
RTMP_TimerListAdd: add timer obj c053f8e0!
RTMP_TimerListAdd: add timer obj c053f9a0!
RTMP_TimerListAdd: add timer obj c053fa60!
RTMP_TimerListAdd: add timer obj c053fb20!
RTMP_TimerListAdd: add timer obj c053fbe0!
RTMP_TimerListAdd: add timer obj c053fca0!
RTMP_TimerListAdd: add timer obj c053fd60!
RTMP_TimerListAdd: add timer obj c053fe20!
RTMP_TimerListAdd: add timer obj c053fee0!
RTMP_TimerListAdd: add timer obj c053ffa0!
RTMP_TimerListAdd: add timer obj c0540060!
RTMP_TimerListAdd: add timer obj c0540120!
RTMP_TimerListAdd: add timer obj c05401e0!
RTMP_TimerListAdd: add timer obj c05402a0!
RTMP_TimerListAdd: add timer obj c0569e70!
RTMP_TimerListAdd: add timer obj c0569ec8!
RTMP_TimerListAdd: add timer obj c056df68!
RTMP_TimerListAdd: add timer obj c056e028!
RTMP_TimerListAdd: add timer obj c056e0e8!
RTMP_TimerListAdd: add timer obj c056e1a8!
RTMP_TimerListAdd: add timer obj c056e268!
RTMP_TimerListAdd: add timer obj c056e328!
RTMP_TimerListAdd: add timer obj c056e3e8!
RTMP_TimerListAdd: add timer obj c056e4a8!
RTMP_TimerListAdd: add timer obj c056e568!
RTMP_TimerListAdd: add timer obj c056e628!
RTMP_TimerListAdd: add timer obj c056e6e8!
RTMP_TimerListAdd: add timer obj c056e7a8!
RTMP_TimerListAdd: add timer obj c056e868!
RTMP_TimerListAdd: add timer obj c056e928!
RTMP_TimerListAdd: add timer obj c056e9e8!
RTMP_TimerListAdd: add timer obj c056eaa8!
RTMP_TimerListAdd: add timer obj c053b63c!
RTMP_TimerListAdd: add timer obj c0569e44!
RTMP_TimerListAdd: add timer obj c053f7b8!
RTMP_TimerListAdd: add timer obj c053f878!
RTMP_TimerListAdd: add timer obj c053f938!
RTMP_TimerListAdd: add timer obj c053f9f8!
RTMP_TimerListAdd: add timer obj c053fab8!
RTMP_TimerListAdd: add timer obj c053fb78!
RTMP_TimerListAdd: add timer obj c053fc38!
RTMP_TimerListAdd: add timer obj c053fcf8!
RTMP_TimerListAdd: add timer obj c053fdb8!
RTMP_TimerListAdd: add timer obj c053fe78!
RTMP_TimerListAdd: add timer obj c053ff38!
RTMP_TimerListAdd: add timer obj c053fff8!
RTMP_TimerListAdd: add timer obj c05400b8!
RTMP_TimerListAdd: add timer obj c0540178!
RTMP_TimerListAdd: add timer obj c0540238!
RTMP_TimerListAdd: add timer obj c05402f8!
RTMP_TimerListAdd: add timer obj c053b710!
RTMP_TimerListAdd: add timer obj c053b73c!
RTMP_TimerListAdd: add timer obj c053b768!
RTMP_TimerListAdd: add timer obj c056dfc0!
RTMP_TimerListAdd: add timer obj c056e080!
RTMP_TimerListAdd: add timer obj c056e140!
RTMP_TimerListAdd: add timer obj c056e200!
RTMP_TimerListAdd: add timer obj c056e2c0!
RTMP_TimerListAdd: add timer obj c056e380!
RTMP_TimerListAdd: add timer obj c056e440!
RTMP_TimerListAdd: add timer obj c056e500!
RTMP_TimerListAdd: add timer obj c056e5c0!
RTMP_TimerListAdd: add timer obj c056e680!
RTMP_TimerListAdd: add timer obj c056e740!
RTMP_TimerListAdd: add timer obj c056e800!
RTMP_TimerListAdd: add timer obj c056e8c0!
RTMP_TimerListAdd: add timer obj c056e980!
RTMP_TimerListAdd: add timer obj c056ea40!
RTMP_TimerListAdd: add timer obj c056eb00!
RTMP_TimerListAdd: add timer obj c0569f18!
RTMP_TimerListAdd: add timer obj c0569f44!
RTMP_TimerListAdd: add timer obj c0569f70!
RTMP_TimerListAdd: add timer obj c04d5014!
RTMP_TimerListAdd: add timer obj c04d4bf8!
RTMP_TimerListAdd: add timer obj c04d4fe4!
RTMP_TimerListAdd: add timer obj c04d5320!
RTMP_TimerListAdd: add timer obj c04d5260!
RTMP_TimerListAdd: add timer obj c04d5290!
RTMP_TimerListAdd: add timer obj c04d8fbc!
RTMP_TimerListAdd: add timer obj c04d8ba0!
RTMP_TimerListAdd: add timer obj c04d8f8c!
RTMP_TimerListAdd: add timer obj c04d92c8!
RTMP_TimerListAdd: add timer obj c04d9208!
RTMP_TimerListAdd: add timer obj c04d9238!
RTMP_TimerListAdd: add timer obj c04dcf64!
RTMP_TimerListAdd: add timer obj c04dcb48!
RTMP_TimerListAdd: add timer obj c04dcf34!
RTMP_TimerListAdd: add timer obj c04dd270!
RTMP_TimerListAdd: add timer obj c04dd1b0!
RTMP_TimerListAdd: add timer obj c04dd1e0!
RTMP_TimerListAdd: add timer obj c04e0f0c!
RTMP_TimerListAdd: add timer obj c04e0af0!
RTMP_TimerListAdd: add timer obj c04e0edc!
RTMP_TimerListAdd: add timer obj c04e1218!
RTMP_TimerListAdd: add timer obj c04e1158!
RTMP_TimerListAdd: add timer obj c04e1188!
RTMP_TimerListAdd: add timer obj c04e4eb4!
RTMP_TimerListAdd: add timer obj c04e4a98!
RTMP_TimerListAdd: add timer obj c04e4e84!
RTMP_TimerListAdd: add timer obj c04e51c0!
RTMP_TimerListAdd: add timer obj c04e5100!
RTMP_TimerListAdd: add timer obj c04e5130!
RTMP_TimerListAdd: add timer obj c04e8e5c!
RTMP_TimerListAdd: add timer obj c04e8a40!
RTMP_TimerListAdd: add timer obj c04e8e2c!
RTMP_TimerListAdd: add timer obj c04e9168!
RTMP_TimerListAdd: add timer obj c04e90a8!
RTMP_TimerListAdd: add timer obj c04e90d8!
RTMP_TimerListAdd: add timer obj c04ece04!
RTMP_TimerListAdd: add timer obj c04ec9e8!
RTMP_TimerListAdd: add timer obj c04ecdd4!
RTMP_TimerListAdd: add timer obj c04ed110!
RTMP_TimerListAdd: add timer obj c04ed050!
RTMP_TimerListAdd: add timer obj c04ed080!
RTMP_TimerListAdd: add timer obj c04f0dac!
RTMP_TimerListAdd: add timer obj c04f0990!
RTMP_TimerListAdd: add timer obj c04f0d7c!
RTMP_TimerListAdd: add timer obj c04f10b8!
RTMP_TimerListAdd: add timer obj c04f0ff8!
RTMP_TimerListAdd: add timer obj c04f1028!
RTMP_TimerListAdd: add timer obj c053e5ec!
RTMP_TimerListAdd: add timer obj c053e1d0!
RTMP_TimerListAdd: add timer obj c053e5bc!
RTMP_TimerListAdd: add timer obj c053e8f8!
RTMP_TimerListAdd: add timer obj c053e61c!
RTMP_TimerListAdd: add timer obj c053e64c!
RTMP_TimerListAdd: add timer obj c053e67c!
RTMP_TimerListAdd: add timer obj c056cdf4!
RTMP_TimerListAdd: add timer obj c056c9d8!
RTMP_TimerListAdd: add timer obj c056cdc4!
RTMP_TimerListAdd: add timer obj c056d100!
RTMP_TimerListAdd: add timer obj c056ce24!
RTMP_TimerListAdd: add timer obj c056ce54!
RTMP_TimerListAdd: add timer obj c056ce84!
RTMP_TimerListAdd: add timer obj c057878c!
RTMP_TimerListAdd: add timer obj c05788a8!
RTMP_TimerListAdd: add timer obj c05787b8!
RTMP_TimerListAdd: add timer obj c056fcc4!
RTMP_TimerListAdd: add timer obj c04d24c4!
RTMP_TimerListAdd: add timer obj c04d646c!
RTMP_TimerListAdd: add timer obj c04da414!
RTMP_TimerListAdd: add timer obj c04de3bc!
RTMP_TimerListAdd: add timer obj c04e2364!
RTMP_TimerListAdd: add timer obj c04e630c!
RTMP_TimerListAdd: add timer obj c04ea2b4!
RTMP_TimerListAdd: add timer obj c04ee25c!
RTMP_TimerListAdd: add timer obj c056f9d0!
APSDCapable[0]=0
APSDCapable[1]=0
APSDCapable[2]=0
APSDCapable[3]=0
APSDCapable[4]=0
APSDCapable[5]=0
APSDCapable[6]=0
APSDCapable[7]=0
APSDCapable[8]=0
APSDCapable[9]=0
APSDCapable[10]=0
APSDCapable[11]=0
APSDCapable[12]=0
APSDCapable[13]=0
APSDCapable[14]=0
APSDCapable[15]=0
default ApCliAPSDCapable[0]=0
default ApCliAPSDCapable[1]=0
start ch = 1, ch->num = 2
30 30 30 30
30 30 30 30 30 30 30 30
26 26 26 26 26 26 26 26 26 26 26 26 26 26 26 26
0 0 0 0 0 0 0 0 0 0 0 0 0 0 0 0
start ch = 3, ch->num = 9
30 30 30 30
30 30 30 30 30 30 30 30
26 26 26 26 26 26 26 26 26 26 26 26 26 26 26 26
26 26 26 26 26 26 26 26 26 26 26 26 26 26 26 26
start ch = 12, ch->num = 2
30 30 30 30
30 30 30 30 30 30 30 30
26 26 26 26 26 26 26 26 26 26 26 26 26 26 26 26
0 0 0 0 0 0 0 0 0 0 0 0 0 0 0 0
start ch = 14, ch->num = 1
30 30 30 30
0 0 0 0 0 0 0 0
0 0 0 0 0 0 0 0 0 0 0 0 0 0 0 0
0 0 0 0 0 0 0 0 0 0 0 0 0 0 0 0
1. Phy Mode = 9
2. Phy Mode = 9
E2PROM: D0 target power=0xff20
E2PROM: 40 MW Power Delta= 0
3. Phy Mode = 9
AntCfgInit: primary/secondary ant 0/1
Initialize RF Central Registers for E2 !!!
Initialize RF Central Registers for E3 !!!
Initialize RF Channel Registers for E2 !!!
Initialize RF Channel Registers for E3 !!!
Initialize RF DCCal Registers for E2 !!!
Initialize RF DCCal Registers for E3 !!!
D1 = -1, D2 = 16, CalCode = 40 !!!
RT6352_Temperature_Init : BBPR49 = 0xffffffff
RT6352_Temperature_Init : TemperatureRef25C = 0xfffffff5
Current Temperature from BBP_R49=0xffffffec
RT6352_TemperatureCalibration:: CurrentTemper
@@@ ed_monitor_init : <===
Main bssid = 54:b8:0a:7d:19:a6

@@@ ed_monitor_init : num = 1
0 0 0 0
38 38 38 38 36 36 32 32
38 38 38 38 36 36 32 32 38 38 38 38 36 36 32 32
38 38 38 38 36 36 32 32 38 38 38 38 36 36 32 32
32 32 32 32 32 32 32 32 26 26
start ch = 38, ch->num = 1
0 0 0 0
38 38 38 38 36 36 32 32
38 38 38 38 36 36 32 32 38 38 38 38 36 36 32 32
38 38 38 38 36 36 32 32 38 38 38 38 36 36 32 32
32 32 32 32 32 32 32 32 26 26
start ch = 40, ch->num = 1
0 0 0 0
38 38 38 38 36 36 32 32
38 38 38 38 36 36 32 32 38 38 38 38 36 36 32 32
38 38 38 38 36 36 32 32 38 38 38 38 36 36 32 32
32 32 32 32 32 32 32 32 26 26
start ch = 42, ch->num = 1
0 0 0 0
38 38 38 38 36 36 32 32
38 38 38 38 36 36 32 32 38 38 38 38 36 36 32 32
38 38 38 38 36 36 32 32 38 38 38 38 36 36 32 32
32 32 32 32 32 32 32 32 26 26
start ch = 44, ch->num = 1
0 0 0 0
38 38 38 38 36 36 32 32
38 38 38 38 36 36 32 32 38 38 38 38 36 36 32 32
38 38 38 38 36 36 32 32 38 38 38 38 36 36 32 32
32 32 32 32 32 32 32 32 26 26
start ch = 46, ch->num = 1
0 0 0 0
38 38 38 38 36 36 32 32
38 38 38 38 36 36 32 32 38 38 38 38 36 36 32 32
38 38 38 38 36 36 32 32 38 38 38 38 36 36 32 32
32 32 32 32 32 32 32 32 26 26
start ch = 48, ch->num = 1
0 0 0 0
38 38 38 38 36 36 32 32
38 38 38 38 36 36 32 32 38 38 38 38 36 36 32 32
38 38 38 38 36 36 32 32 38 38 38 38 36 36 32 32
32 32 32 32 32 32 32 32 26 26
start ch = 52, ch->num = 1
0 0 0 0
38 38 38 38 36 36 32 32
38 38 38 38 36 36 32 32 38 38 38 38 36 36 32 32
38 38 38 38 36 36 32 32 38 38 38 38 36 36 32 32
32 32 32 32 32 32 32 32 26 26
start ch = 54, ch->num = 1
0 0 0 0
38 38 38 38 36 36 32 32
38 38 38 38 36 36 32 32 38 38 38 38 36 36 32 32
38 38 38 38 36 36 32 32 38 38 38 38 36 36 32 32
32 32 32 32 32 32 32 32 26 26
start ch = 56, ch->num = 1
0 0 0 0
38 38 38 38 36 36 32 32
38 38 38 38 36 36 32 32 38 38 38 38 36 36 32 32
38 38 38 38 36 36 32 32 38 38 38 38 36 36 32 32
32 32 32 32 32 32 32 32 26 26
start ch = 58, ch->num = 1
0 0 0 0
38 38 38 38 36 36 32 32
38 38 38 38 36 36 32 32 38 38 38 38 36 36 32 32
38 38 38 38 36 36 32 32 38 38 38 38 36 36 32 32
32 32 32 32 32 32 32 32 26 26
start ch = 60, ch->num = 1
0 0 0 0
38 38 38 38 36 36 32 32
38 38 38 38 36 36 32 32 38 38 38 38 36 36 32 32
38 38 38 38 36 36 32 32 38 38 38 38 36 36 32 32
32 32 32 32 32 32 32 32 26 26
start ch = 62, ch->num = 1
0 0 0 0
38 38 38 38 36 36 32 32
38 38 38 38 36 36 32 32 38 38 38 38 36 36 32 32
38 38 38 38 36 36 32 32 38 38 38 38 36 36 32 32
32 32 32 32 32 32 32 32 26 26
start ch = 64, ch->num = 1
0 0 0 0
38 38 38 38 36 36 32 32
38 38 38 38 36 36 32 32 38 38 38 38 36 36 32 32
38 38 38 38 36 36 32 32 38 38 38 38 36 36 32 32
32 32 32 32 32 32 32 32 26 26
start ch = 100, ch->num = 1
0 0 0 0
38 38 38 38 36 36 32 32
38 38 38 38 36 36 32 32 38 38 38 38 36 36 32 32
38 38 38 38 36 36 32 32 38 38 38 38 36 36 32 32
32 32 32 32 32 32 32 32 26 26
start ch = 102, ch->num = 1
0 0 0 0
38 38 38 38 36 36 32 32
38 38 38 38 36 36 32 32 38 38 38 38 36 36 32 32
38 38 38 38 36 36 32 32 38 38 38 38 36 36 32 32
32 32 32 32 32 32 32 32 26 26
start ch = 104, ch->num = 1
0 0 0 0
38 38 38 38 36 36 32 32
38 38 38 38 36 36 32 32 38 38 38 38 36 36 32 32
38 38 38 38 36 36 32 32 38 38 38 38 36 36 32 32
32 32 32 32 32 32 32 32 26 26
start ch = 106, ch->num = 1
0 0 0 0
38 38 38 38 36 36 32 32
38 38 38 38 36 36 32 32 38 38 38 38 36 36 32 32
38 38 38 38 36 36 32 32 38 38 38 38 36 36 32 32
32 32 32 32 32 32 32 32 26 26
start ch = 108, ch->num = 1
0 0 0 0
38 38 38 38 36 36 32 32
38 38 38 38 36 36 32 32 38 38 38 38 36 36 32 32
38 38 38 38 36 36 32 32 38 38 38 38 36 36 32 32
32 32 32 32 32 32 32 32 26 26
start ch = 110, ch->num = 1
0 0 0 0
38 38 38 38 36 36 32 32
38 38 38 38 36 36 32 32 38 38 38 38 36 36 32 32
38 38 38 38 36 36 32 32 38 38 38 38 36 36 32 32
32 32 32 32 32 32 32 32 26 26
start ch = 112, ch->num = 1
0 0 0 0
38 38 38 38 36 36 32 32
38 38 38 38 36 36 32 32 38 38 38 38 36 36 32 32
38 38 38 38 36 36 32 32 38 38 38 38 36 36 32 32
32 32 32 32 32 32 32 32 26 26
start ch = 116, ch->num = 1
0 0 0 0
38 38 38 38 36 36 32 32
38 38 38 38 36 36 32 32 38 38 38 38 36 36 32 32
38 38 38 38 36 36 32 32 38 38 38 38 36 36 32 32
32 32 32 32 32 32 32 32 26 26
start ch = 118, ch->num = 1
0 0 0 0
38 38 38 38 36 36 32 32
38 38 38 38 36 36 32 32 38 38 38 38 36 36 32 32
38 38 38 38 36 36 32 32 38 38 38 38 36 36 32 32
32 32 32 32 32 32 32 32 26 26
start ch = 120, ch->num = 1
0 0 0 0
38 38 38 38 36 36 32 32
38 38 38 38 36 36 32 32 38 38 38 38 36 36 32 32
38 38 38 38 36 36 32 32 38 38 38 38 36 36 32 32
32 32 32 32 32 32 32 32 26 26
start ch = 122, ch->num = 1
0 0 0 0
38 38 38 38 36 36 32 32
38 38 38 38 36 36 32 32 38 38 38 38 36 36 32 32
38 38 38 38 36 36 32 32 38 38 38 38 36 36 32 32
32 32 32 32 32 32 32 32 26 26
start ch = 124, ch->num = 1
0 0 0 0
38 38 38 38 36 36 32 32
38 38 38 38 36 36 32 32 38 38 38 38 36 36 32 32
38 38 38 38 36 36 32 32 38 38 38 38 36 36 32 32
32 32 32 32 32 32 32 32 26 26
start ch = 126, ch->num = 1
0 0 0 0
38 38 38 38 36 36 32 32
38 38 38 38 36 36 32 32 38 38 38 38 36 36 32 32
38 38 38 38 36 36 32 32 38 38 38 38 36 36 32 32
32 32 32 32 32 32 32 32 26 26
start ch = 128, ch->num = 1
0 0 0 0
38 38 38 38 36 36 32 32
38 38 38 38 36 36 32 32 38 38 38 38 36 36 32 32
38 38 38 38 36 36 32 32 38 38 38 38 36 36 32 32
32 32 32 32 32 32 32 32 26 26
start ch = 132, ch->num = 1
0 0 0 0
38 38 38 38 36 36 32 32
38 38 38 38 36 36 32 32 38 38 38 38 36 36 32 32
38 38 38 38 36 36 32 32 38 38 38 38 36 36 32 32
32 32 32 32 32 32 32 32 26 26
start ch = 134, ch->num = 1
0 0 0 0
38 38 38 38 36 36 32 32
38 38 38 38 36 36 32 32 38 38 38 38 36 36 32 32
38 38 38 38 36 36 32 32 38 38 38 38 36 36 32 32
32 32 32 32 32 32 32 32 26 26
start ch = 136, ch->num = 1
0 0 0 0
38 38 38 38 36 36 32 32
38 38 38 38 36 36 32 32 38 38 38 38 36 36 32 32
38 38 38 38 36 36 32 32 38 38 38 38 36 36 32 32
32 32 32 32 32 32 32 32 26 26
start ch = 140, ch->num = 1
0 0 0 0
38 38 38 38 36 36 32 32
38 38 38 38 36 36 32 32 38 38 38 38 36 36 32 32
38 38 38 38 36 36 32 32 38 38 38 38 36 36 32 32
32 32 32 32 32 32 32 32 26 26
start ch = 149, ch->num = 1
0 0 0 0
38 38 38 38 36 36 32 32
38 38 38 38 36 36 32 32 38 38 38 38 36 36 32 32
38 38 38 38 36 36 32 32 38 38 38 38 36 36 32 32
32 32 32 32 32 32 32 32 26 26
start ch = 151, ch->num = 1
0 0 0 0
38 38 38 38 36 36 32 32
38 38 38 38 36 36 32 32 38 38 38 38 36 36 32 32
38 38 38 38 36 36 32 32 38 38 38 38 36 36 32 32
32 32 32 32 32 32 32 32 26 26
start ch = 153, ch->num = 1
0 0 0 0
38 38 38 38 36 36 32 32
38 38 38 38 36 36 32 32 38 38 38 38 36 36 32 32
38 38 38 38 36 36 32 32 38 38 38 38 36 36 32 32
32 32 32 32 32 32 32 32 26 26
start ch = 155, ch->num = 1
0 0 0 0
38 38 38 38 36 36 32 32
38 38 38 38 36 36 32 32 38 38 38 38 36 36 32 32
38 38 38 38 36 36 32 32 38 38 38 38 36 36 32 32
32 32 32 32 32 32 32 32 26 26
start ch = 157, ch->num = 1
0 0 0 0
38 38 38 38 36 36 32 32
38 38 38 38 36 36 32 32 38 38 38 38 36 36 32 32
38 38 38 38 36 36 32 32 38 38 38 38 36 36 32 32
32 32 32 32 32 32 32 32 26 26
start ch = 159, ch->num = 1
0 0 0 0
38 38 38 38 36 36 32 32
38 38 38 38 36 36 32 32 38 38 38 38 36 36 32 32
38 38 38 38 36 36 32 32 38 38 38 38 36 36 32 32
32 32 32 32 32 32 32 32 26 26
start ch = 161, ch->num = 1
0 0 0 0
38 38 38 38 36 36 32 32
38 38 38 38 36 36 32 32 38 38 38 38 36 36 32 32
38 38 38 38 36 36 32 32 38 38 38 38 36 36 32 32
32 32 32 32 32 32 32 32 26 26
start ch = 165, ch->num = 1
0 0 0 0
38 38 38 38 36 36 32 32
38 38 38 38 36 36 32 32 38 38 38 38 36 36 32 32
38 38 38 38 36 36 32 32 38 38 38 38 36 36 32 32
32 32 32 32 32 32 32 32 26 26
start ch = 169, ch->num = 1
0 0 0 0
38 38 38 38 36 36 32 32
38 38 38 38 36 36 32 32 38 38 38 38 36 36 32 32
38 38 38 38 36 36 32 32 38 38 38 38 36 36 32 32
32 32 32 32 32 32 32 32 26 26
start ch = 173, ch->num = 1
0 0 0 0
38 38 38 38 36 36 32 32
38 38 38 38 36 36 32 32 38 38 38 38 36 36 32 32
38 38 38 38 36 36 32 32 38 38 38 38 36 36 32 32
32 32 32 32 32 32 32 32 26 26
1. Phy Mode = 49
2. Phy Mode = 49
ext_pa_current_setting = 1
3. Phy Mode = 49
AntCfgInit: primary/secondary ant 0/1
ChipStructAssign(): RALINK6590 hook !
MCS Set = ff 00 00 00 01
MT76x0_ChipBBPAdjust():rf_bw=2, ext_ch=1, PrimCh=36, HT-CentCh=38, VHT-CentCh=42
MT76x0_ChipSwitchChannel: DefaultTargetPwr = 30
APStartUp(): AP Set CentralFreq at 42(Prim=36, HT-CentCh=38, VHT-CentCh=42, BBP_BW=2)
Main bssid = 54:b8:0a:7d:19:a8
<==== rt28xx_init, Status=0
MT76x0_ChipSwitchChannel: DefaultTargetPwr = 30
MT76x0_ChipSwitchChannel: DefaultTargetPwr = 30
MT76x0_ChipSwitchChannel: DefaultTargetPwr = 30
MT76x0_ChipSwitchChannel: DefaultTargetPwr = 30
MT76x0_ChipSwitchChannel: DefaultTargetPwr = 30
MT76x0_ChipSwitchChannel: DefaultTargetPwr = 30
MT76x0_ChipSwitchChannel: DefaultTargetPwr = 30
MT76x0_ChipSwitchChannel: DefaultTargetPwr = 30
MT76x0_ChipSwitchChannel: DefaultTargetPwr = 30
MT76x0_ChipSwitchChannel: DefaultTargetPwr = 30
MT76x0_ChipSwitchChannel: DefaultTargetPwr = 30
MT76x0_ChipSwitchChannel: DefaultTargetPwr = 30
MT76x0_ChipSwitchChannel: DefaultTargetPwr = 30
RT6352_TemperatureCalibration:: CurrentTemper < 20
MT76x0_ChipSwitchChannel: DefaultTargetPwr = 30
MT76x0_ChipSwitchChannel: DefaultTargetPwr = 30
MT76x0_ChipSwitchChannel: DefaultTargetPwr = 30
MT76x0_ChipSwitchChannel: DefaultTargetPwr = 30
MT76x0_ChipSwitchChannel: DefaultTargetPwr = 30
MT76x0_ChipSwitchChannel: DefaultTargetPwr = 30
MT76x0_ChipSwitchChannel: DefaultTargetPwr = 30
MT76x0_ChipSwitchChannel: DefaultTargetPwr = 30
MT76x0_ChipSwitchChannel: DefaultTargetPwr = 30
MT76x0_ChipSwitchChannel: DefaultTargetPwr = 30
MT76x0_ChipBBPAdjust():rf_bw=2, ext_ch=1, PrimCh=44, HT-CentCh=46, VHT-CentCh=42
MT76x0_ChipSwitchChannel: DefaultTargetPwr = 30
APStartUp(): AP Set CentralFreq at 42(Prim=44, HT-CentCh=46, VHT-CentCh=42, BBP_BW=2)
0x1300 = 00064380
RTMPDrvOpen(1):Check if PDMA is idle!
RTMPDrvOpen(2):Check if PDMA is idle!
device rai0 entered promiscuous mode
br0: port 4(rai0) entering forwarding state
br0: port 4(rai0) entering forwarding state
device apclii0 entered promiscuous mode
br0: port 5(apclii0) entering forwarding state
br0: port 5(apclii0) entering forwarding state
Interface doesn't accept private ioctl...
set (8BE2): Invalid argument
killall: udhcpc: no process killed
SIOCSIFFLAGS: Cannot assign requested address
rm: cannot remove `/var/tmp/previous_dn': No such file or directory
rm: cannot remove `/var/tmp/previous_dns': No such file or directory
rm: cannot remove `/var/tmp/m_flag': No such file or directory
rm: cannot remove `/var/tmp/o_flag': No such file or directory
RTNETLINK answers: No such file or directory
cat: /var/etc/resolv.conf: No such file or directory
sh: cannot create /proc/sys/net/ipv6/conf/br0/disable_ipv6: Directory nonexistent
Start IPv6 dhclient
Sat Jan  1 00:00:00 UTC 2011
rdnssd is already active !
RT6352_TemperatureCalibration:: CurrentTemper < 20
Start IPv6 dhclient
DHCP server start.
device_lan_ip=192.168.0.50 , device_lan_subnet_mask=255.255.255.0
max_leases value (254) not sane, setting to 20 instead
Unable to open /var/misc/udhcpd.leases for reading
llmnr: have no available linklocal address. wait count=0
/tmp/password has been created
2011-01-01 00:00:00: (network.c.247) warning: please use server.use-ipv6 only for hostnames, not without server.bind / empty address; your config will break if the kernel default for IPV6_V6ONLY changes
Failed to kill daemon: No such file or directory
Daemon already running on PID 315
RT6352_TemperatureCalibration:: CurrentTemper < 20
RT6352_TemperatureCalibration:: CurrentTemper < 20
RT6352_TemperatureCalibration:: CurrentTemper < 20
Warning: Do not attempt to modify the firmware of this device if you do not have hardware to rewrite the firmware to the SPI flash. Before I even powered up the device the first time, I took a dump of the SPI flash in case I ended up “bricking” the device (which I did, many times).
You can build your own SPI flash reader/writer with a Teensy and a chip clip. I am using the work of Trammell Hudson who gave an awesome talk at 31C3 on manipulating UEFI on MacBook Pros for fun and profit.
You can find a copy of the SPI dump of my device (firmware 1.05) here. You cannot flash this image without hardware tools as described above. If you flash this dump, your device will have the same MAC address as mine. This dump should be used only as an option of last resort.
Poking around the D-Link firmware for vulnerabilities
I would love to say that I’m an infosec god, and that I can hack anything that moves. Really though, I’m not. I tried to find exploits for D-Link, and it doesn’t seem that there is any shortage of HNAP exploits and other nasty things, but I was unable to get the device to do any interesting things for me, like start a telnet server.
Disassembling the firmware to learn more about installed software
Since my Google-fu is weak, I couldn’t find the firmware images for this device on D-Link’s website at first, so I just disassembled the firmware I dumped from the MXIC.
$ binwalk dlink-dap1520.bin

DECIMAL       HEXADECIMAL     DESCRIPTION
--------------------------------------------------------------------------------
99968         0x18680         U-Boot version string, "U-Boot 1.1.3 (Aug  8 2013 - 10:32:46)"
100732        0x1897C         HTML document header
101832        0x18DC8         HTML document footer
101954        0x18E42         HTML document header
102754        0x19162         HTML document footer
102878        0x191DE         HTML document header
105248        0x19B20         HTML document footer
105367        0x19B97         HTML document header
106050        0x19E42         HTML document footer
106174        0x19EBE         HTML document header
106255        0x19F0F         HTML document footer
196962        0x30162         Unix path: /01/01/00/00/00
327680        0x50000         uImage header, header size: 64 bytes, header CRC: 0xC9616E23, created: 2014-08-22 08:41:24, image size: 909208 bytes, Data Address: 0x80000000, Entry Point: 0x8000C310, data CRC: 0x895D3AE, OS: Linux, CPU: MIPS, image type: OS Kernel Image, compression type: lzma, image name: "Linux Kernel Image"
327744        0x50040         LZMA compressed data, properties: 0x5D, dictionary size: 33554432 bytes, uncompressed size: 2798288 bytes
1310720       0x140000        Squashfs filesystem, little endian, version 4.0, compression:xz, size: 3459080 bytes, 649 inodes, blocksize: 65536 bytes, created: 2014-08-22 08:41:35
5177344       0x4F0000        uImage header, header size: 64 bytes, header CRC: 0x225D8E97, created: 2013-09-26 08:58:51, image size: 829684 bytes, Data Address: 0x80000000, Entry Point: 0x8000C310, data CRC: 0xA98529B2, OS: Linux, CPU: MIPS, image type: OS Kernel Image, compression type: lzma, image name: "Linux Kernel Image"
5177408       0x4F0040        LZMA compressed data, properties: 0x5D, dictionary size: 33554432 bytes, uncompressed size: 2544052 bytes
6029312       0x5C0000        Squashfs filesystem, little endian, version 4.0, compression:xz, size: 2192260 bytes, 345 inodes, blocksize: 65536 bytes, created: 2013-09-26 08:59:04
Something interesting, there are two Squashfs filesystems on this device. This makes some sense, given what we saw earlier in the uboot logs:
Check image validation:
Image1 Header Magic Number --> OK
Image2 Header Magic Number --> OK
Image1 Header Checksum --> OK
Image2 Header Checksum --> OK
Image1 Data Checksum --> raspi_read: from:50040 len:ddf98
OK
Image2 Data Checksum --> raspi_read: from:4f0040 len:ca8f4
OK
Image1 Stable Flag --> Not stable
Image1 Try Counter --> 0

Image1: OK Image2: OK
Both images are OK!!!
Using dd, we can extract both Squashfs images from the firmware file. I used my dump, but actually I would recommend you just head over to D-Link's website and download the 1.06 firmware image [ZIP] and dump that instead. However, D-Link's firmware is missing the second Squashfs filesystem.
Squashfs #1
$ dd if=dlink-dap1520.bin of=squashfs1.bin bs=1 skip=1310720
Squashfs #2
$ dd if=dlink-dap1520.bin of=squashfs2.bin bs=1 skip=6029312
Run the 'ol unsquashfs on squashfs1.bin and squashfs2.bin, and you'll have the extracted filesystems of the squashfs images in my dump the firmware. Remember to rename the directory squashfs-root between runs, or specify unsquashfs -d with a different directory name to decompress the images into respective directories.
If you're using the D-Link firmware from their website, the dd command is a bit different due to offsets and all:
$ binwalk DAP1520A1_FW106B04.bin

DECIMAL       HEXADECIMAL     DESCRIPTION
--------------------------------------------------------------------------------
0             0x0             uImage header, header size: 64 bytes, header CRC: 0xBA3B64BA, created: 2015-01-22 03:48:48, image size: 909200 bytes, Data Address: 0x80000000, Entry Point: 0x8000C310, data CRC: 0x310BA125, OS: Linux, CPU: MIPS, image type: OS Kernel Image, compression type: lzma, image name: "Linux Kernel Image"
64            0x40            LZMA compressed data, properties: 0x5D, dictionary size: 33554432 bytes, uncompressed size: 2798288 bytes
983040        0xF0000         Squashfs filesystem, little endian, version 4.0, compression:xz, size: 3460300 bytes, 649 inodes, blocksize: 65536 bytes, created: 2015-01-22 03:48:54
$ dd if=DAP1520A1_FW106B04.bin of=dlink106.bin bs=1 skip=983040
Now unsquashfs that, and you'll have firmware 1.06 from D-Link.
I'm going to leave investigation of the individual files in the firmware to the reader, but I'd like to state some facts I learned while investigating the firmware:
The second squashfs image is the D-Link recovery OS. This OS will boot if the first kernel fails the integrity check performed in uboot. Hilariously, it won't boot into the recovery environment if you flash a bad kernel to the device in Image 1 as I found out.
You might have noticed the flash layout from the binwalk of the firmware dump I made, but here is the actual firmware layout as reported by Linux:
0x000000000000-0x000000800000 : "ALL"
0x000000000000-0x000000030000 : "u-boot"
0x000000030000-0x000000040000 : "nvram"
0x000000040000-0x000000050000 : "Factory"
0x000000050000-0x000000140000 : "linux4"
0x000000140000-0x0000004e0000 : "rootfs"
0x0000004e0000-0x0000004f0000 : "LANG"
0x0000004f0000-0x0000005c0000 : "linux4b"
0x0000005c0000-0x000000800000 : "rootfsb"
To summarize:
ALL: This spans from 0x000000 to 0x800000 which is the entire 8MB of the MXIC chip
u-boot: u-boot loader
nvram: Storage space for configuration variables. More on this in part 2
Factory: No idea.
linux4: This is the primary kernel on the device, and the one that will boot if your device has a valid Image 1. This is the firmware that you download from D-Link's website. Despite the label, it is not Linux 4.x, but 2.6.36.
rootfs: Squashfs compressed filesystem of the primary OS (Image 1)
LANG: No idea.
linux4b: Recovery kernel. This kernel will be booted if Image 1 kernel fails verification.
rootfsb: Squashfs compressed recovery filesystem. This, along with linux4b boot if Image 1 is corrupt and allow you to flash a firmware through the web interface to restore the device.
I must say that the inclusion of a recovery OS is an interesting move on D-Link's part. Since I don't buy their products normally, I'm not sure if other D-Link devices also have this recovery OS on them. It seems like a good idea to include on this device, since if a firmware update fails, since there are no Ethernet ports on the device it's not possible to recover via TFTP, as it would be on a normal router. The firmware update from D-Link's website only updates Image 1 squashfs and kernel. Image 2 on my device is firmware version 1.00, and the squashfs filesystem is smaller than the Image 1 OS.
If you do some maths on the mtd blocks, you will see that with the stock D-Link layout, the Image 1 kernel can only be 983040 bytes (0xF0000) large. Any larger, and the kernel will not fit in flash. The recovery kernel has to be even smaller, maximum 851968 bytes (0xD0000).
Since this device lacks Ethernet ports, it doesn't include some of the features one would consider necessary on a home router, such as port forwarding, firewall configuration, and the like. I suspect that not needing to include these features gave D-Link the space on flash to store a recovery OS. As you can see though, they did have to make some compromises in the allocation of flash to fit the main and recovery OS within 8MB. The device does not function as a WiFi repeater in the recovery OS, only allowing you to reflash a firmware.
As much as I would love to cram all of what I did into one post, this is getting long already.
Stay tuned for part 2 where I compile the D-Link GPL firmware from source and backdoor the device to allow shell access without a login (infosec is hard). If you've heard horror stories about GPL firmwares before, they're all true...
Come back soon!