Category Archives: Security

Jenkins authenticate with FreeIPA LDAP

I run a Jenkins server to build projects like the Arietta G25 Kernel and Banana Pi Kernel.

I also run a FreeIPA server for central authentication and user rights management. I’m not an expert on LDAP and Kerberos, which is why I like FreeIPA because it allows me to manage these without requiring that I be an LDAP or Kerberos demigod.

So, here’s how to configure Jenkins to authenticate against FreeIPA. You will need to install the Jenkins LDAP plugin before proceeding.

Manage Jenkins

The plugin can be installed by clicking on: Manage Jenkins -> Manage Plugins -> Available -> Search “LDAP Plugin”

On the FreeIPA server create an LDIF file to define an unprivileged user to read the LDAP tree. The FreeIPA LDAP server does not appear to support anonymous binds. I recommend the makepasswd program to generate the user password.

-bash-4.2$ cat jenkins.ldif 
dn: uid=jenkins,cn=sysaccounts,cn=etc,dc=watchmysys,dc=com
changetype: add
objectclass: account
objectclass: simplesecurityobject
uid: jenkins
userPassword: 7b1yYzNINU
passwordExpirationTime: 20380119031407Z
nsIdleTimeout: 0

To create the user you need to apply this LDIF to LDAP:

ldapmodify -h ipa.watchmysys.com -p 389 -x -D "cn=Directory Manager" -W -f jenkins.ldif

When the LDAP plugin is installed go back to the “Manage Jenkins” menu, click on “Configure Global Security” and “Enable security”

Next select “Security Realm” -> “LDAP”, and configure the settings for your IPA server as described below:

Jenkins LDAP Security

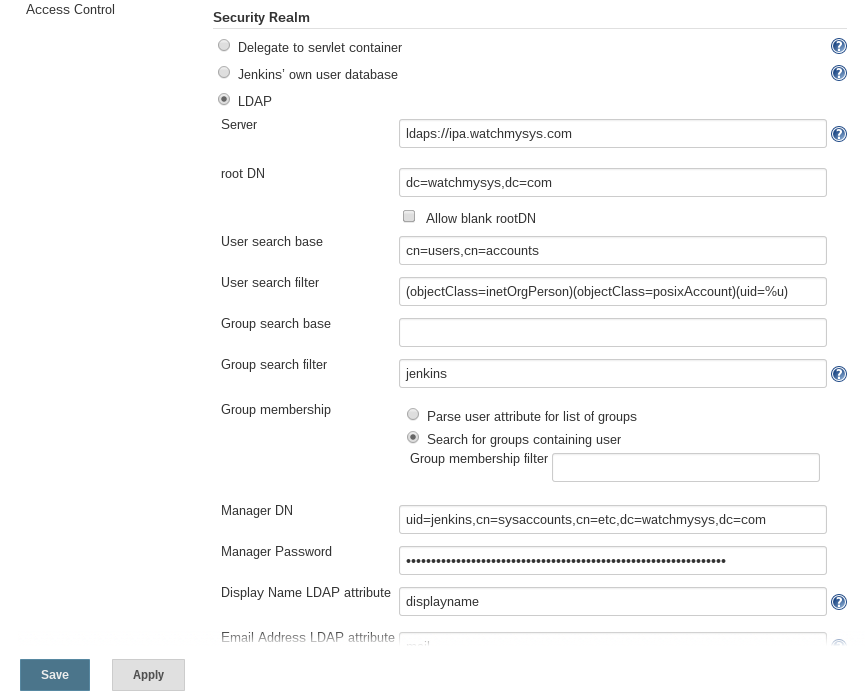
Server: ldaps://ipa.watchmysys.com
root DN: dc=watchmysys,dc=com
User search base: cn=users,cn=accounts
User search filter: (objectClass=inetOrgPerson)(objectClass=posixAccount)(uid=%u)
Group search filter: jenkins
Manager DN: uid=jenkins,cn=sysaccounts,cn=etc,dc=watchmysys,dc=com
Manager password: 7b1yYzNINU
Display Name LDAP attribute: displayname
Email Address LDAP attribute: mail

You may want to choose ldap:// instead of ldaps:// during your testing. I found it useful to run tcpdump between my Jenkins server and IPA server to diagnose authentication failures.

In FreeIPA create a role for Jenkins users:
FreeIPA Jenkins Role

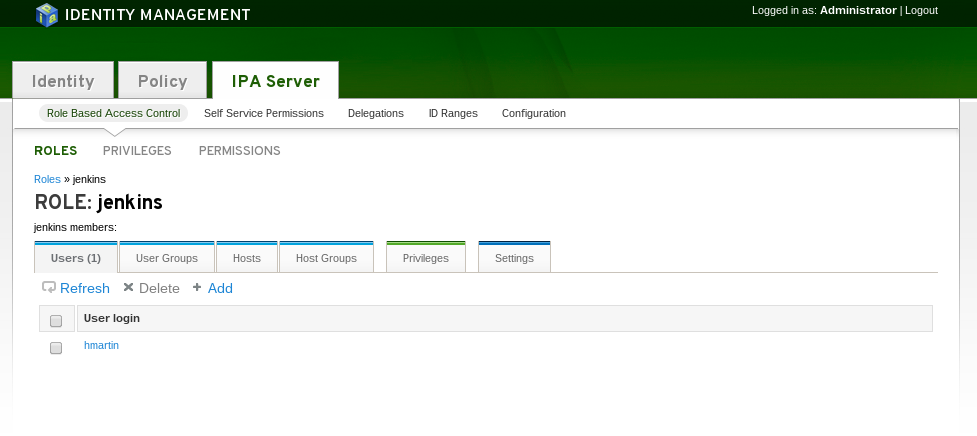
Here is what the corresponding LDAP object is:

# jenkins, roles, accounts, watchmysys.com
dn: cn=jenkins,cn=roles,cn=accounts,dc=watchmysys,dc=com
objectClass: groupofnames
objectClass: nestedgroup
objectClass: top
cn: jenkins
description: Jenkins administrators
member: uid=hmartin,cn=users,cn=accounts,dc=watchmysys,dc=com

I decided that all Jenkins users should be allowed to administer once logged in. You may decide to implement a more complex security system with different privilege levels.

Jenkins Authentication Strategy

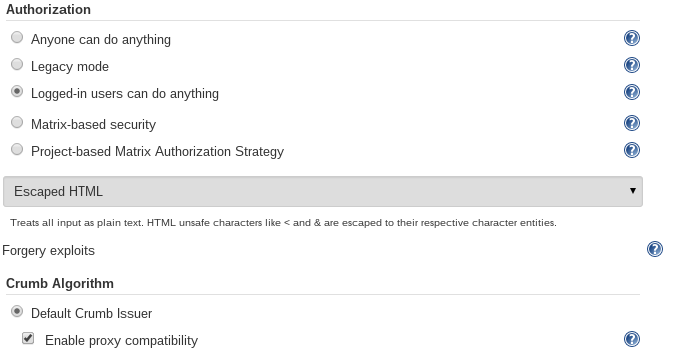
Save the changes. You will be unable to administer Jenkins without logging in now. Jenkins will update config.xml in its home with the new security settings:

  <useSecurity>true</useSecurity>
  <authorizationStrategy class="hudson.security.FullControlOnceLoggedInAuthorizationStrategy"/>
  <securityRealm class="hudson.security.LDAPSecurityRealm" plugin="[email protected]">
    <server>ldaps://ipa.watchmysys.com</server>
    <rootDN>dc=watchmysys,dc=com</rootDN>
    <inhibitInferRootDN>false</inhibitInferRootDN>
    <userSearchBase>cn=users,cn=accounts</userSearchBase>
    <userSearch>(objectClass=inetOrgPerson)(objectClass=posixAccount)(uid=%u)</userSearch>
    <groupSearchFilter>jenkins</groupSearchFilter>
    <groupMembershipStrategy class="jenkins.security.plugins.ldap.FromGroupSearchLDAPGroupMembershipStrategy">
      <filter></filter>
    </groupMembershipStrategy>
    <managerDN>uid=jenkins,cn=sysaccounts,cn=etc,dc=watchmysys,dc=com</managerDN>
    <managerPasswordSecret>bdV4rdfP9sQ1JTsDfJYGQSRvqYtsSafFdVLYwiuv6nTyiaAnfIwxeC2GNfQmy0dfs</managerPasswordSecret>
    <disableMailAddressResolver>false</disableMailAddressResolver>
    <displayNameAttributeName>displayname</displayNameAttributeName>
    <mailAddressAttributeName>mail</mailAddressAttributeName>
  </securityRealm>

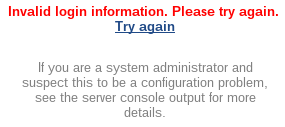
If you cannot login to Jenkins using your LDAP username and password then remove the above lines from your config.xml and restart Jenkins. Jenkins will revert back to the default policy of anonymous users are admins.

If your user is not in the Jenkins role on the FreeIPA server you will not be able to login.
Jenkins LDAP Failed Login

You should now have LDAP-based authentication working in Jenkins. You now have all the benefits of central user management in Jenkins, enjoy!

Direct wifi traffic through a VPN with openwrt

I think we probably all know someone who’s received a copyright violation notice. Usually these notices list the user’s IP address, date, and copyrighted file that was shared while demanding some payment or the content owner will take the user to court.

Today we will explore how to setup a wireless access point that automatically tunnels traffic through a VPN, so that you don’t have to worry about the activities of your guests on your network.

Note: If your VPN provider does not push the “redirect-gateway” option then DNS queries from clients will still go through your normal internet connection. This means that activities on the guest wifi are not completely anonymous!

For this I will be using the following:

  • TP-Link WR703N running OpenWRT 12.09 (Attitude Adjustment)
  • 1GB USB key
  • a subscription-based VPN provider

I chose the WR703N mainly because I had one and it is small, has low power consumption, and is quite inexpensive.

There are many instructions for how to install OpenWRT on the WR703N, so I’m not going to discuss that here. Also the choice of VPN providers differs based on your needs and price range. I recommend reading the TorrentFreak articles on VPN providers to find out which one is best for you.

A 1GB USB key is required as the flash on the WR703N is not large enough to hold an OpenWRT installation with luci and openvpn installed. First we need to move the OpenWRT OS from the internal flash to the USB key, this will allow us to install the additional packages required, namely openvpn. I followed these instructions for how to transfer the OS from internal flash to USB. I’ll provide a tl;dr:

  • Partition the USB key with a DOS partition table, make at least one partition of type 82 (Linux)
  • Format this partition as ext4
  • Install block-mount, kmod-usb-core, kmod-usb-ohci, kmod-usb-storage, kmod-usb2, kmod-scsi-core, kmod-scsi-generic, kmod-fs-ext4, libblkid

Plug in the USB key. Check dmesg on the router and you should see that it recognizes the USB key as a block device. Create two temporary folders, one to mount the USB key at, and the other to bind mount /

mount /dev/sda1 /tmp/usb
mount --bind / /tmp/flash
tar -C /tmp/flash -cvf - . | tar -C /tmp/usb -xf -
umount /tmp/flash
umount /tmp/usb

Now that we’ve moved the OpenWRT installation to the USB key we have to configure the router to boot from the USB key instead of internal flash. Edit /etc/config/fstab and change the following:

config mount
     option device /dev/sda1
     option target /home
     option enabled 0

to:

config mount
     option device /dev/sda1
     option target /
     option enabled 1

Now reboot the router, it should boot off the USB key now.

Now there is lots of available space

Now there is lots of available space

I followed this post for most of the following openvpn configuration. Now go ahead and install the openvpn package:

opkg install openvpn

scp all the crt, ovpn and other openvpn configuration files to /etc/openvpn on the router.

You can test openvpn by ssh’ing into the router and running:

openvpn --config myconfig.ovpn

from /etc/openvpn. Assuming that works, now open the luci interface on the router to create a new interface:

  1. Go to the Network tab, click on Interfaces
  2. Create a new interface, I called mine “VPN” and set the protocol to “unmanaged”
  3. Specify tun0 as the network interface for the VPN interface
  4. Under “Advanced Settings” click the “Bring up on boot” checkbox

Now you have a choice, you can either:

  1. add the VPN interface we are in the process of creating above to the WAN zone, in which case a route with the prefix 0.0.0.0/1 will be added, which will supersede the WAN route of 0.0.0.0/0 through longest prefix matching, or
  2. create a firewall zone in luci to ensure that any traffic from LAN is automatically forwarded directly to the VPN, never going to the WAN. This is based on an openwrt wiki example

If you choose the second, then you need to do some additional work in luci:

  1. Go to the Network tab, click on Firewall
  2. Add a new Zone, I called mine “vpn” set it to Input:accept, Output:accept, Forward:accept
  3. Forward all traffic from the LAN to the vpn zone and visa versa, remove the WAN zone from the forwarding from the LAN zone.

Your zones should look like this now:

Firewall Zones

Firewall Zones

Go back to the Interface page and edit the VPN interface. Under the “Firewall Settings” tab change the zone from “wan” to “vpn”. The interface should look like this now:

VPN Interface Firewall Zone Settings

VPN Interface > Firewall Settings > Assign Firewall Zone “vpn”

There is an airvpn thread full of information on how to ensure that traffic goes from the LAN through the VPN. The above achieves something similar to the iptables rule mentioned in the airvpn thread.

Now that we have the routing all configured, you can go back to openvpn. If the ovpn file has “auth-user-pass” in it, you can create a text file which contains your VPN username on the first line, and your password on the second, and change the ovpn file to have “auth-user-pass credentials.txt” so openvpn will not prompt you for them when it connects.

Next we need to configure openvpn to start a boot:

  1. Go to the System tab, click on Startup
  2. At the bottom in the text box, add the following above “exit 0”
/usr/sbin/openvpn --cd /etc/openvpn --daemon --config /etc/openvpn/myvpn.ovpn &

Now we want to secure the router more. You might have some technically savvy guests who may try to break into the admin interface of your router to reconfigure it.

Before we block access to the management ports from the “bad” (guest-facing) side, we need to ensure that we don’t lock ourselves out of the router. Go to the Network tab, click on Firewall, click on “Port Forwards” add new rules to forward SSH (TCP 22), HTTP (TCP 80), and HTTPS (TCP 443) from WAN to the IP address of your router, in my case this is 192.168.1.1. Make absolutely sure you can access these ports from the WAN interface (your home LAN) before you do the following!

Now, go to the Network tab, click on Firewall, click on “Custom Rules” and add these rules in the space provided:

iptables -I zone_lan_ACCEPT 1 -p tcp -i wlan0 --dport 22 -j DROP
iptables -I zone_lan_ACCEPT 1 -p tcp -i wlan0 --dport 80 -j DROP
iptables -I zone_lan_ACCEPT 1 -p tcp -i wlan0 --dport 443 -j DROP

This blocks your wireless clients from accessing ports 22, 80, and 443 on the router, which means if they try to go to the luci interface or SSH into the router from the wireless side, they can’t! You need to restart the firewall for these changes to take effect.

The performance appears to be quite good. I am not sure precisely what the speed of my internet connection here is, but I was able to get over 6MBit/s down using the VPN and the speedof.me speed testing service, which seems very good.

That’s it. I recommend rebooting the router to make sure everything you did will survive a power cycle. IANAL but this solution should allow you to avoid any legal ramifications for the activities of guests on your IP address since they’ll be using a VPN and have a different termination IP address.

So, in summary:

  1. All traffic from wireless clients will be directed through the VPN, if the VPN is down wireless clients will not have internet, nor will they have access to your network
  2. Wireless clients are considered hostile, and as such are blocked from accessing ports 22, 80, and 443 on the router to prevent break-in attempts.